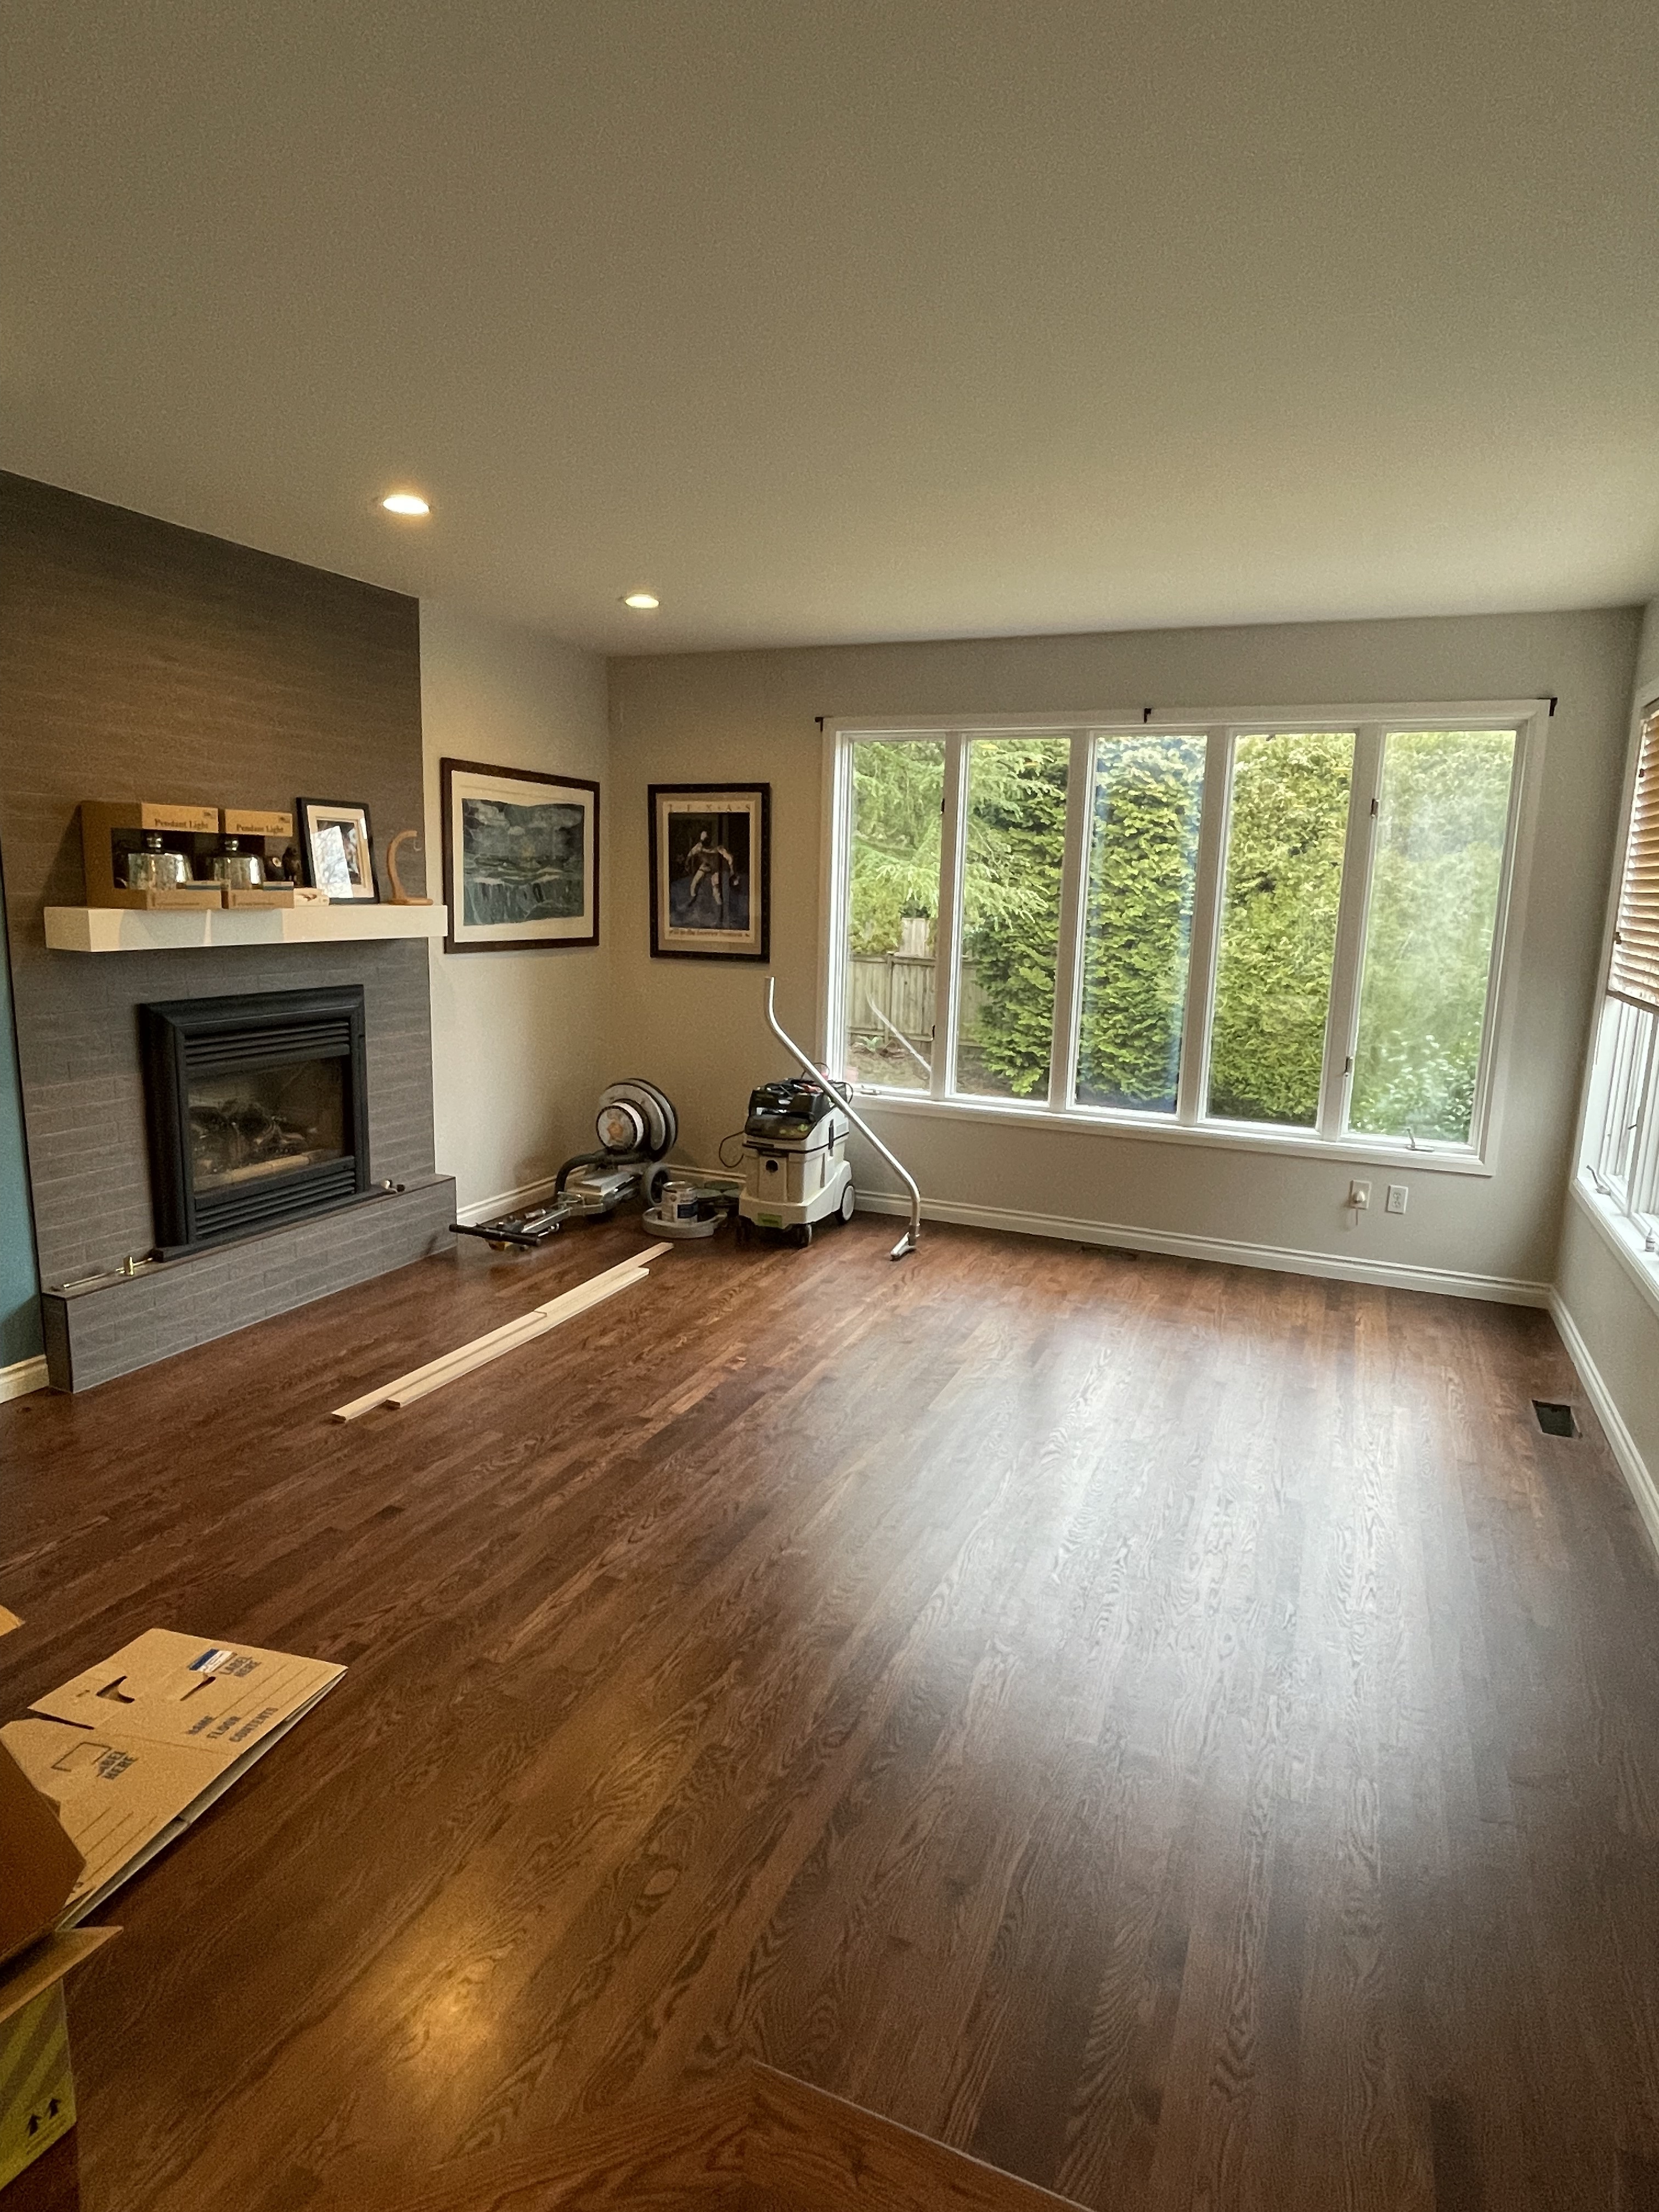
Since our counter tops have been delayed, for some unknown reason which I mentioned a couple of posts ago, we had some time to leave our living room empty of furniture. At first, we just wanted to make sure the finish was fully cured. But, as it sat empty, I got the idea to finish the wall painting.
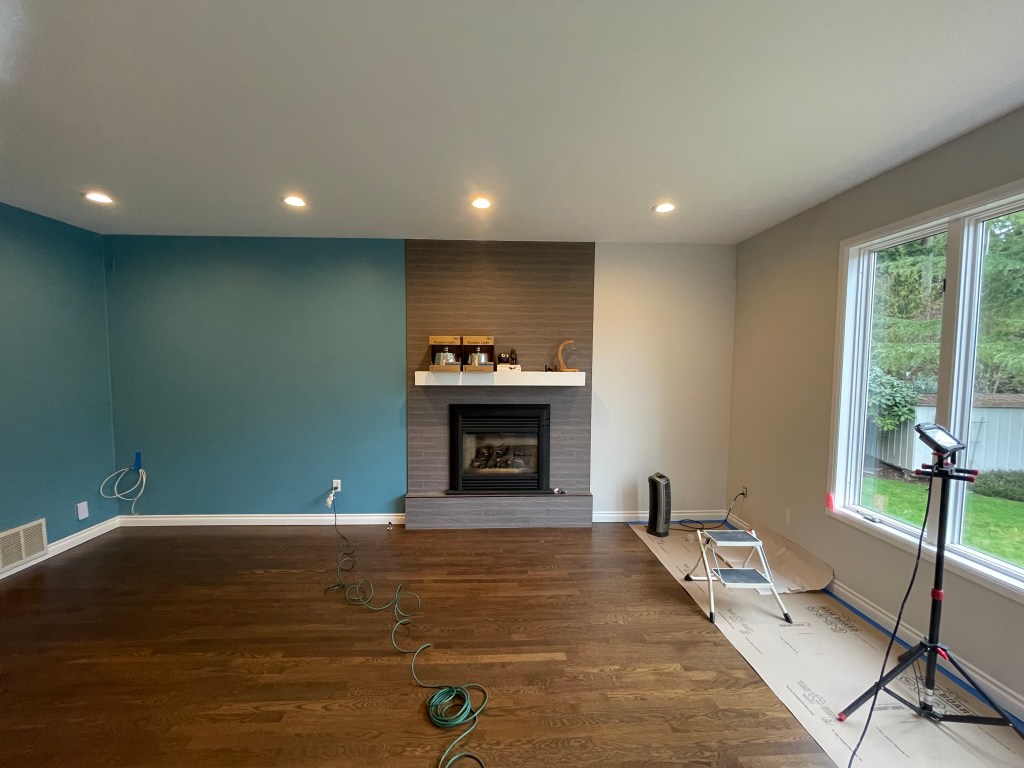
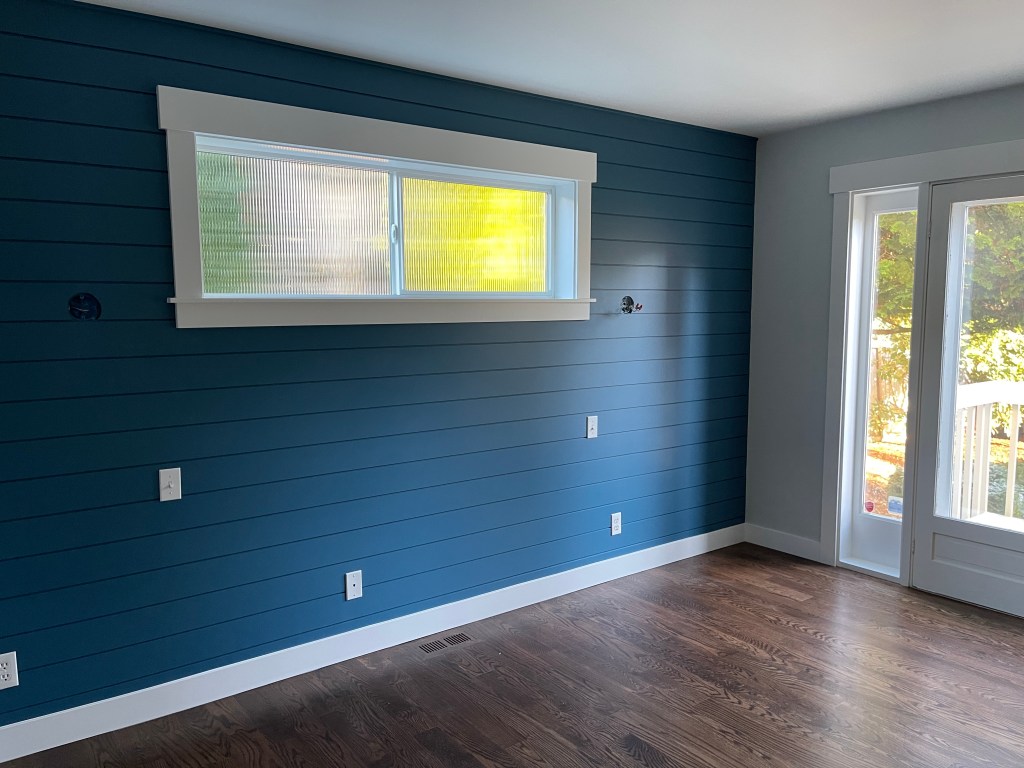
Now, you will notice that the wall on the left side of the fireplace is blue (the color is called “lakeshore”, but I will call it “blue” for simplicity) and on the right side it is the drab green/gray color that the house was painted when we moved in. I call that color “paste”.
The “before” picture of the fireplace wall.
The original idea was to paint it, but we didn’t want to move the furniture around. And since there was a nice hard break in the wall, we could do it in phases.
Now is the time for a new phase.
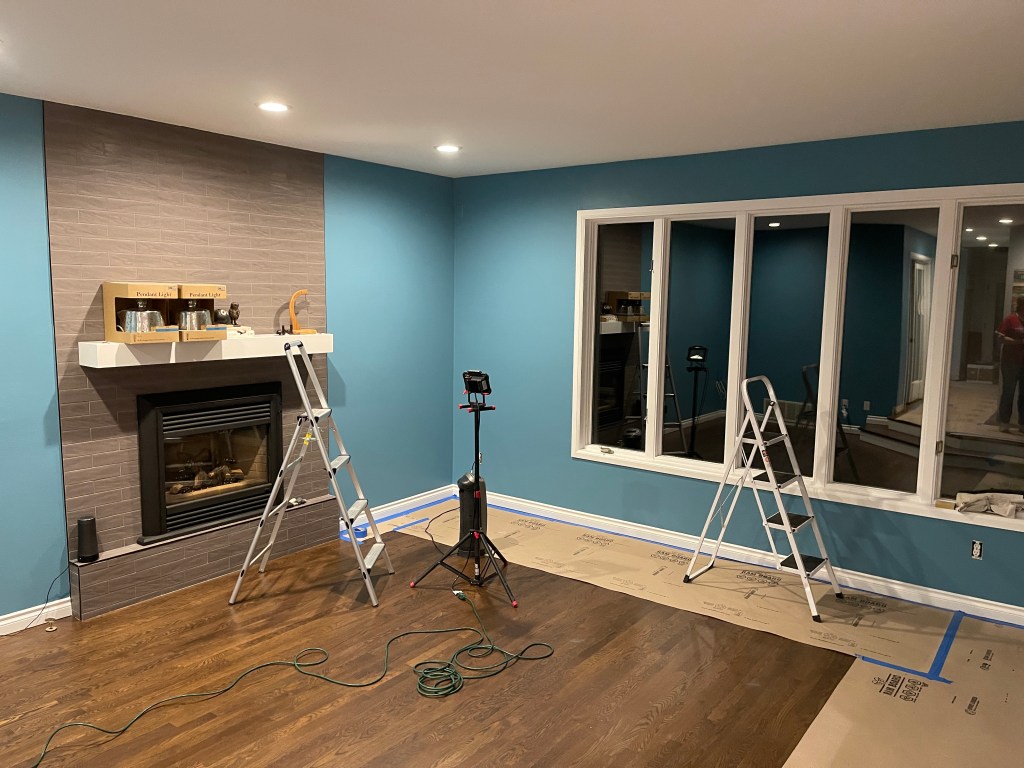
So, we patched some holes, sanded, added texture, taped it off and then painted. First, we updated the tepid gray “paste” to a much cooler gray color which is painted in the gym room. Then, we added the blue to the remaining side walls in the living room. This includes the window wall, but not the back half-wall. That one we painted the new gray.
Here is the difference between the two grays: the one on the right is new, while the left side is the old color throughout the whole house.
New blue walls completing the room.
Final gray matching the room behind the half-wall (which is the gym).
You might see that some touchups are needed at some of the edges if you zoom in to the pictures, but we’ve completed those now. You can also see all of the items stashed in the gym while we shuffle all our furniture between the rooms being refinished.
The next step will be to move all our stuff back into the living room and clean out what we crammed into the kitchen and other rooms.
Now, we have to work with the stone people again soon to get things started up. Let’s hope we can get things moving soon.
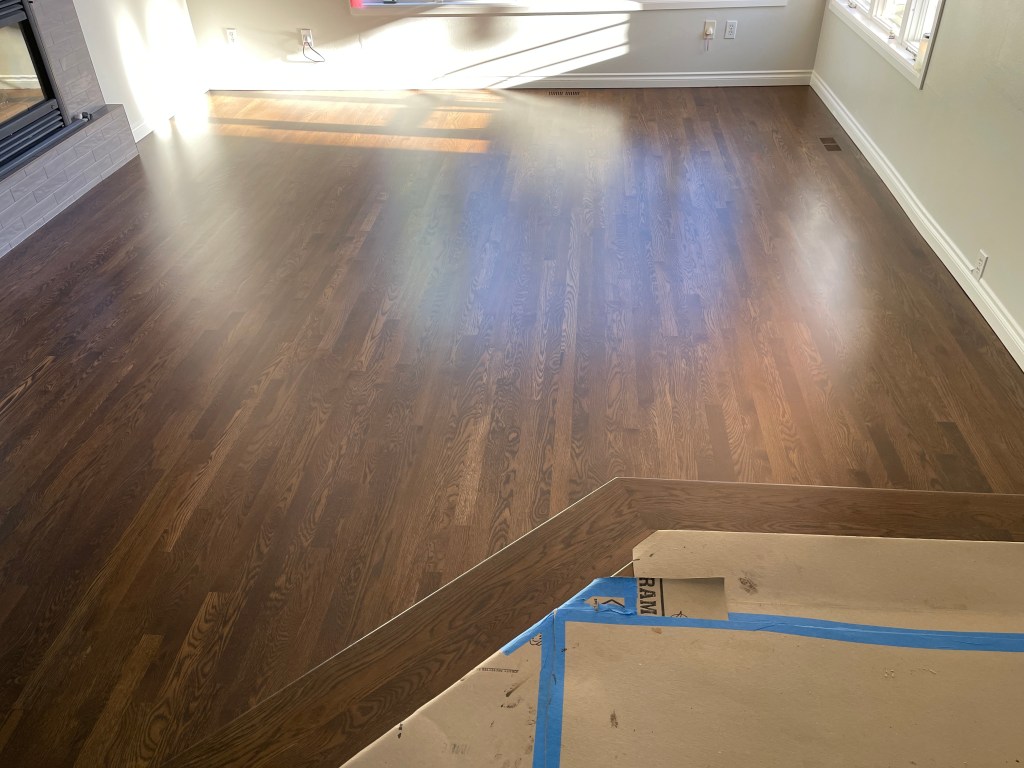
As an update to the floor refinishing drama, the living room refinishing is done. There are only two tiny little bubbles in the finish, so we can start moving our furniture back in tonight.
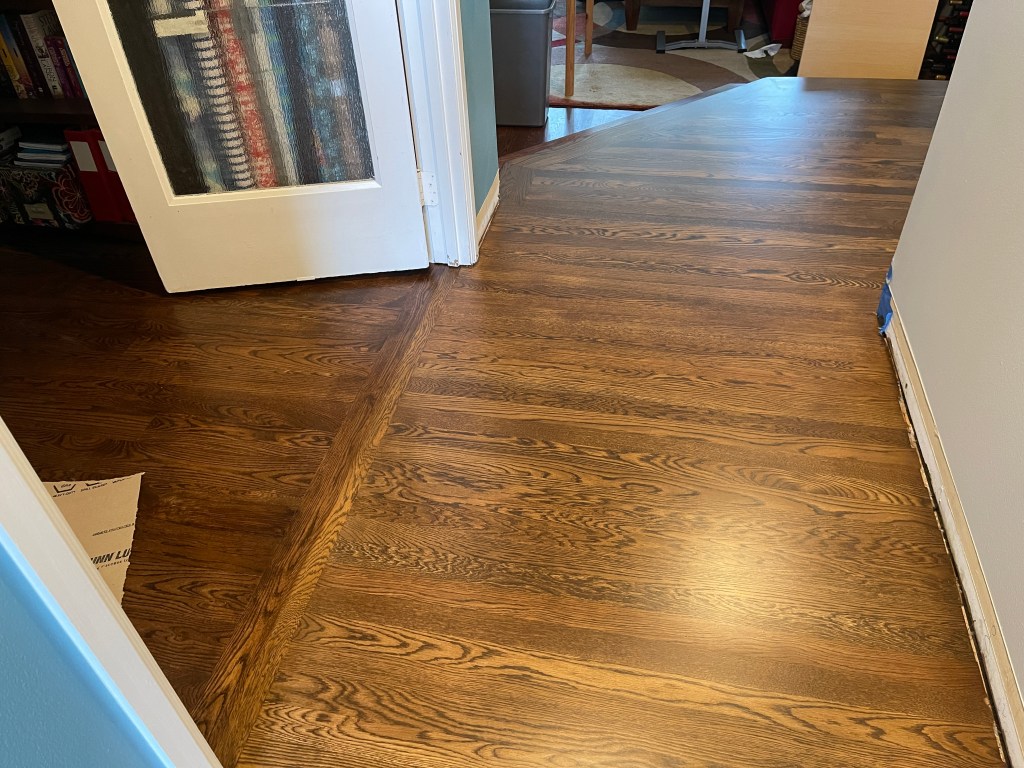
Here is the whole floor completed.
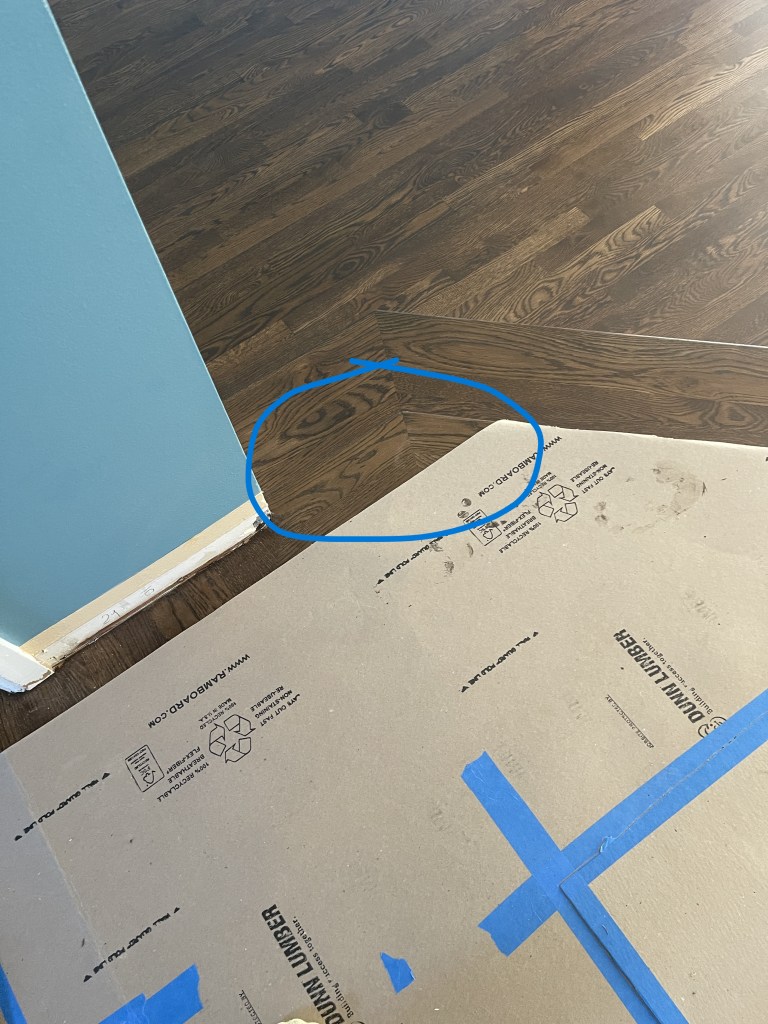
Notice the highlighted area – the colors on the steps and floors match perfectly with the main floor.
We have a winner!
Now, we can start moving furniture back into the living room so we can clear things out of the front of the kitchen before the construction teams come back and make more dust.
There are still some tweaks to do before we call it “finished”, but those are mainly some squeak remediation and spot repair. Those can wait a little while, but we’re almost done.
When reading “accoutrements”, you absolutely must use a French accent. After all, we are talking about the “fancy bits” of the kitchen which put the spit-and-polish finish on the whole project.
Well, not “spit” in literal terms, I hope.
I am talking about kitchen hardware. The faucets, handles (or “pulls” as I have been made aware) and knobs. This has been a long journey started well before the cabinets were finalized. It has taken many months, maybe even the better part of a year to finally get it right.
It was not easy – in fact, it took much prayer in the end to finally land on just the right combination of items to make it all fit together.
There was also weeping and gnashing of teeth in there as well.
As our appliances and range hood are all brushed stainless steel, we wanted to compliment the finish of those, but not stray too far. In other words, no brass, no chrome, not even the black that is so popular today. We also wanted to have the shape harmonize with the curves of the range hood. There were also stipulations about comfort and safety – no sharp edges or things that would snag clothing when walking by. There are some amazing looking handles, but many have pointy bits on the ends which could draw blood.
No, we wanted curves. Not too many, but understated and tasteful. So began the shopping. Store after store after web store after web store. Several Amazon orders were placed and returned. What we finally found was a knob we liked in a finish called Antique Silver. It is beautiful and made the final cut for installing in the kitchen. We ordered a few of the matching handles – I mean pulls… right: matching pulls from the supplier in the same finish. At first pass, they were good – not “great”, but they were mostly what we wanted: no pointy bits, easy to get your hand around, and matching in color.
Or were they? Once we laid them out next to the actual cabinets (we had samples before, but once you have the cabinets they are going on, you really don’t know what they are actually going to look like), we absolutely did not love them. They were dark and dull compared to the knobs, and in the right light a completely different color tone.
As the cabinets were nearing completion, we were under pressure to make a choice quickly: after all – the installers were supposed to install the hardware when they installed the cabinets. So, a last-minute scramble to a few local stores was in order. We stopped at the local high-end place where there were several cool options, but none we fell in love with. And a good thing too! One option we looked at was $150 PER PULL! (We were targeting between $3 and $10 per pull.)
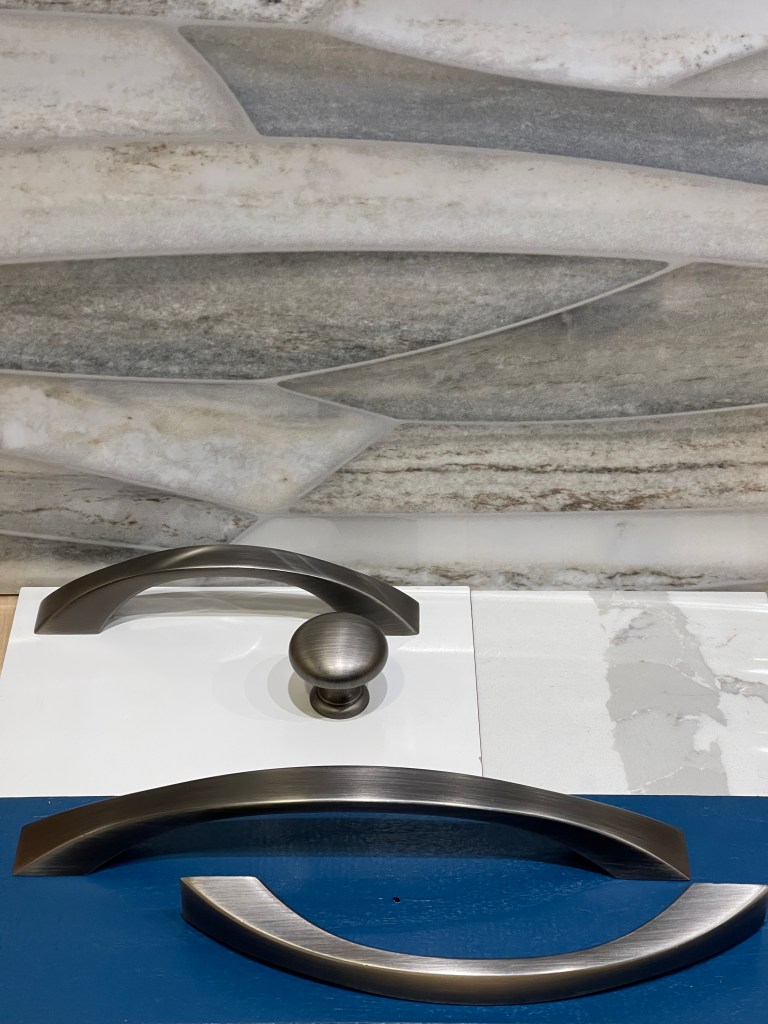
Finally, we went back to a place we had been before since it was on the way home. Lo-and-behold what did we see, but a wholly new item on their display panels. It was something close to a pull we had liked before but couldn’t find in the right color. This was a pull in Jeffrey Alexander line called “Philip” (yes, there are a lot of name similarities in there and they are not lost on me…) and they even had a finish called Brushed Pewter that was extremely close to the finish of the knobs.
We had found our hardware! Order placed, order received. Here is a picture of the hardware.
Three different sizes of pull on a sample color of our cabinets, counter material (middle right) and backsplash over the rangetop in the back.
If you notice, the sheen on the knobs and pull is bright and similar to brushed steel, but a little darker – enough to match, but have a slight contrast to the stainless of the rest of the accessories.
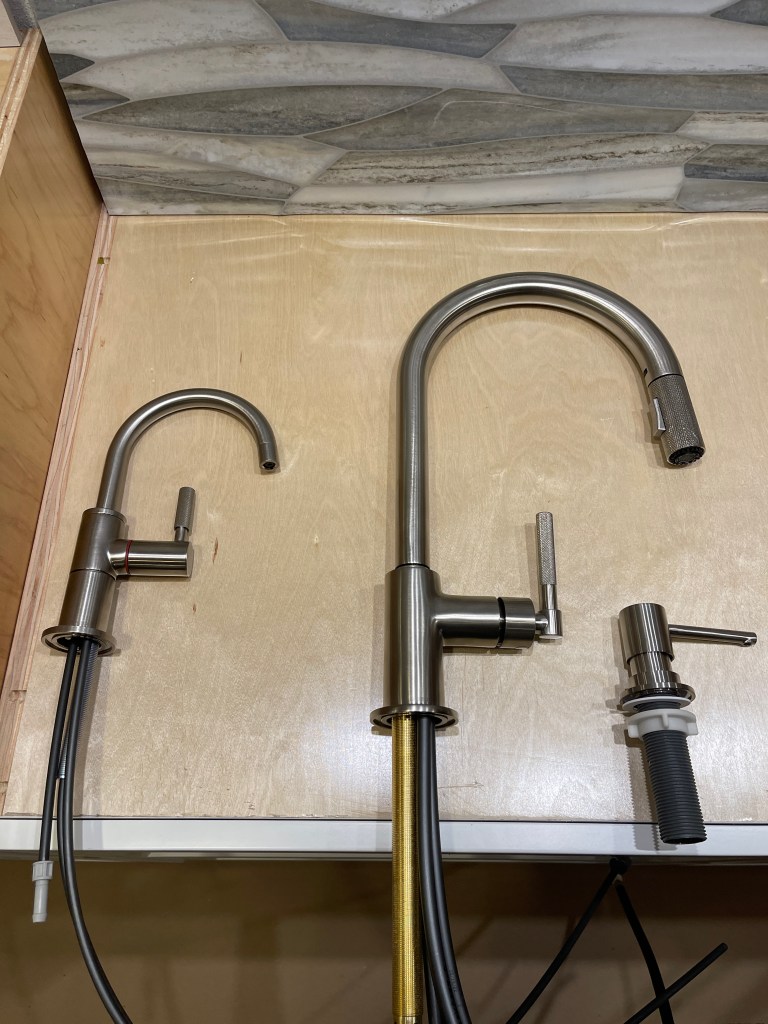
The next bits we were able to obtain were the faucets and soap dispenser. This actually took us a while, but not quite as long as the knobs and pulls. I wanted something more industrial – you know the coiled over giant spring faucets you find in restaurant kitchens, but Laura didn’t like that so much. We found a compromise initially, but it was too expensive.
The shopping went on for several months, when one day we were looking for hardware at Ferguson and not finding it. We happened to look along the back wall and there were some faucets we could browse, so we did. One option we saw was a black and gold simple faucet with a knurled sprayer and handle. Of course, it was totally the wrong color, but they said they had it in stainless to match. We had already kind of settled on the compromise faucet, but the hesitation I had in ordering it should have been a sign that it wasn’t right for the project.
So, online I went to the manufacturer’s website to look at the stainless model. Sure enough, it was beautiful, and it even had a soap dispenser to match. What was even more surprising is that there was a hot water faucet in the matching style as well! We have become addicted to having hot water so quickly available and easy, so the faucet was a must have item.
But it was also very expensive. What would we do now?
Go to eBay of course. Sure enough, there were “open box” items that were for sale. These were new with fully unopened parts packages, some had damaged outer boxes, but all were new and never used. Buying the big faucet there got us $300 off retail. The hot water faucet was about a 75% savings, and the soap dispenser… well that was just a little cheaper, but worth it. Now they all match.
Here they are.
It’s a brand we are familiar with: we put a Brizo faucet in our kitchen in Virginia when we remodeled that one. We like the quality and feel of it.
We’re excited to get this going!
Now, we just have to wait for the counter tops… which have been delayed for a reason not well explained to me.
One of the important considerations when planning our remodel and budgeting process was that we would minimize the cost wherever possible – and that meant re-using most of the appliances in the kitchen. An exception, of course, was to be the new rangetop. We were very keen to move from the electric stove top to use gas instead. Gas is SO much better to cook with, as most professional kitchens are well aware.
That list of appliances to keep included the oven/microwave combo, dishwasher, and refrigerator. That was our plan three years ago in the beginning.
Fast-forward to 6 months ago.
We were getting close to finalizing the plans for the cabinet layout, and my initial idea was to create a 48″ space for the fridge which would have two 6″ spacers to close the space up to a regular (our current) fridge size of 36″. This would help us both save the cost of replacement and allow us to upgrade to a 48″ model when we were able to. I had my eye on the 48″ side-by-side Sub-Zero, but that costs as much as a new motorcycle and after the Texas ice-storm (read here why this is relevant) a couple of years ago combined with an overall materials pipeline slowdown, that meant a 12-month wait for a new one. I was prepared to wait.
Then: it started. The icemaker broke. Well, it wasn’t the first time, and the previous times I was able to fix it by thawing it out or replacing some parts. This time, I couldn’t easily fix it: I started filling ice trays. Soon after, we started to notice puddles on the floor next to it. At first, we thought it was a dropped ice cube, or some spilled water from the spout. But it kept happening. Then our food started to get damp, and the shelves started to mold and remain wet.
We had to clean it out and that meant removing all the food to the spare fridge in the garage (which was not big enough to hold all of it) and into some coolers.
We tried to get it repaired, but the repair service we called said the only way to fix it was to replace it completely (the specific model we had was known to have these kinds of problems, apparently.)
So, I finally got frustrated enough to give in to purchasing a new fridge, but the real challenge was this: do we get an interim one that would be similar to the old one for cheap (well, cheap-ish: nothing worth buying is cheap these days) or do we go for the one that had my eye on?
Turns out, this was a more complex question than we realized. It might seem an easy decision to just get the cheaper stand-in option since the desired end result was over a year away anyhow. But, even the more reasonable models were still clocking in at much more than “throw away” money. We looked around for some used high-end models, but due to the supply issues, those were as much or more expensive than ordering a new one.
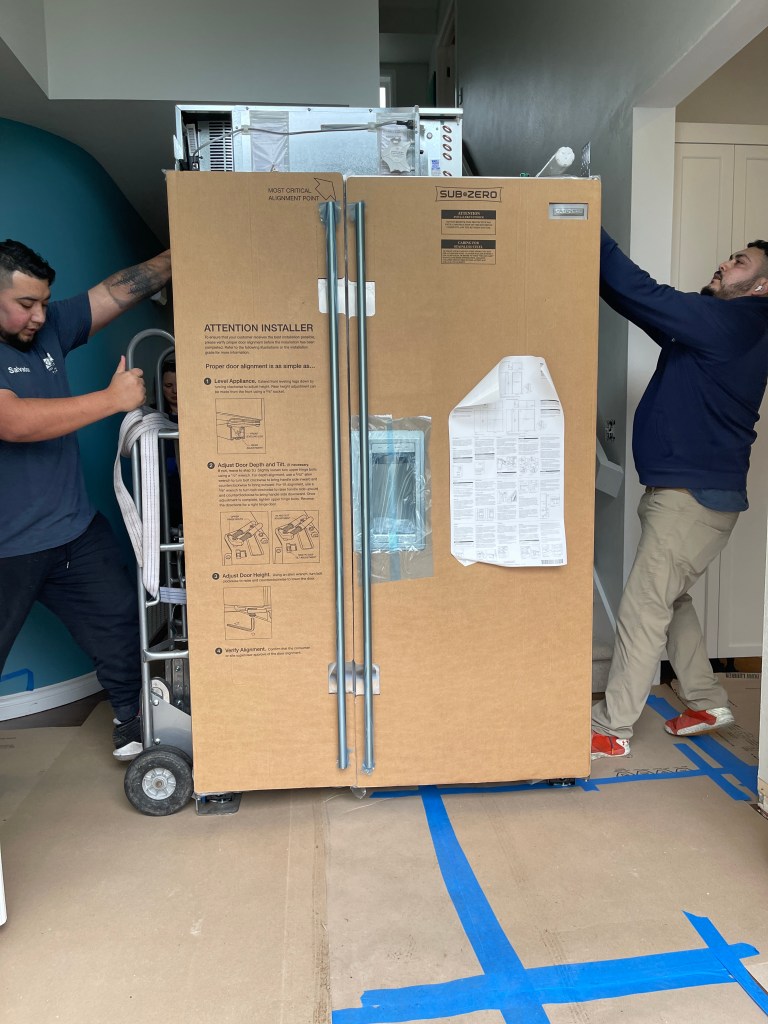
Finally, we went to Frederick’s Appliance Center in Redmond. After visiting several major local appliance stores, we were prepared for the same sad story of waiting a year for a new one, but that was not the case here. It seems that the people at Frederick’s plan well ahead. They actually order inventory long before customers demand it. They have a long running supply chain of various models and makes coming in at different times. In fact, if we were ready to install in a week, they just happened to have one similar to our needs in the warehouse right then. Of course, it wasn’t the 100% model I wanted – it had the wrong handles, but it was THERE. Instead, though, I chose to wait since our cabinets weren’t ready. I put in an order to be delivered in the first part of December.
I went with the Sub-Zero I originally wanted as the end result. And yes, that upped the budget by quite a bit.
Now, the cabinets weren’t ready then, so they allowed me to hold the fridge for delivery until it was ready. So, last week, it came.
The unboxing. I love that there are no loose parts or wires on the back.
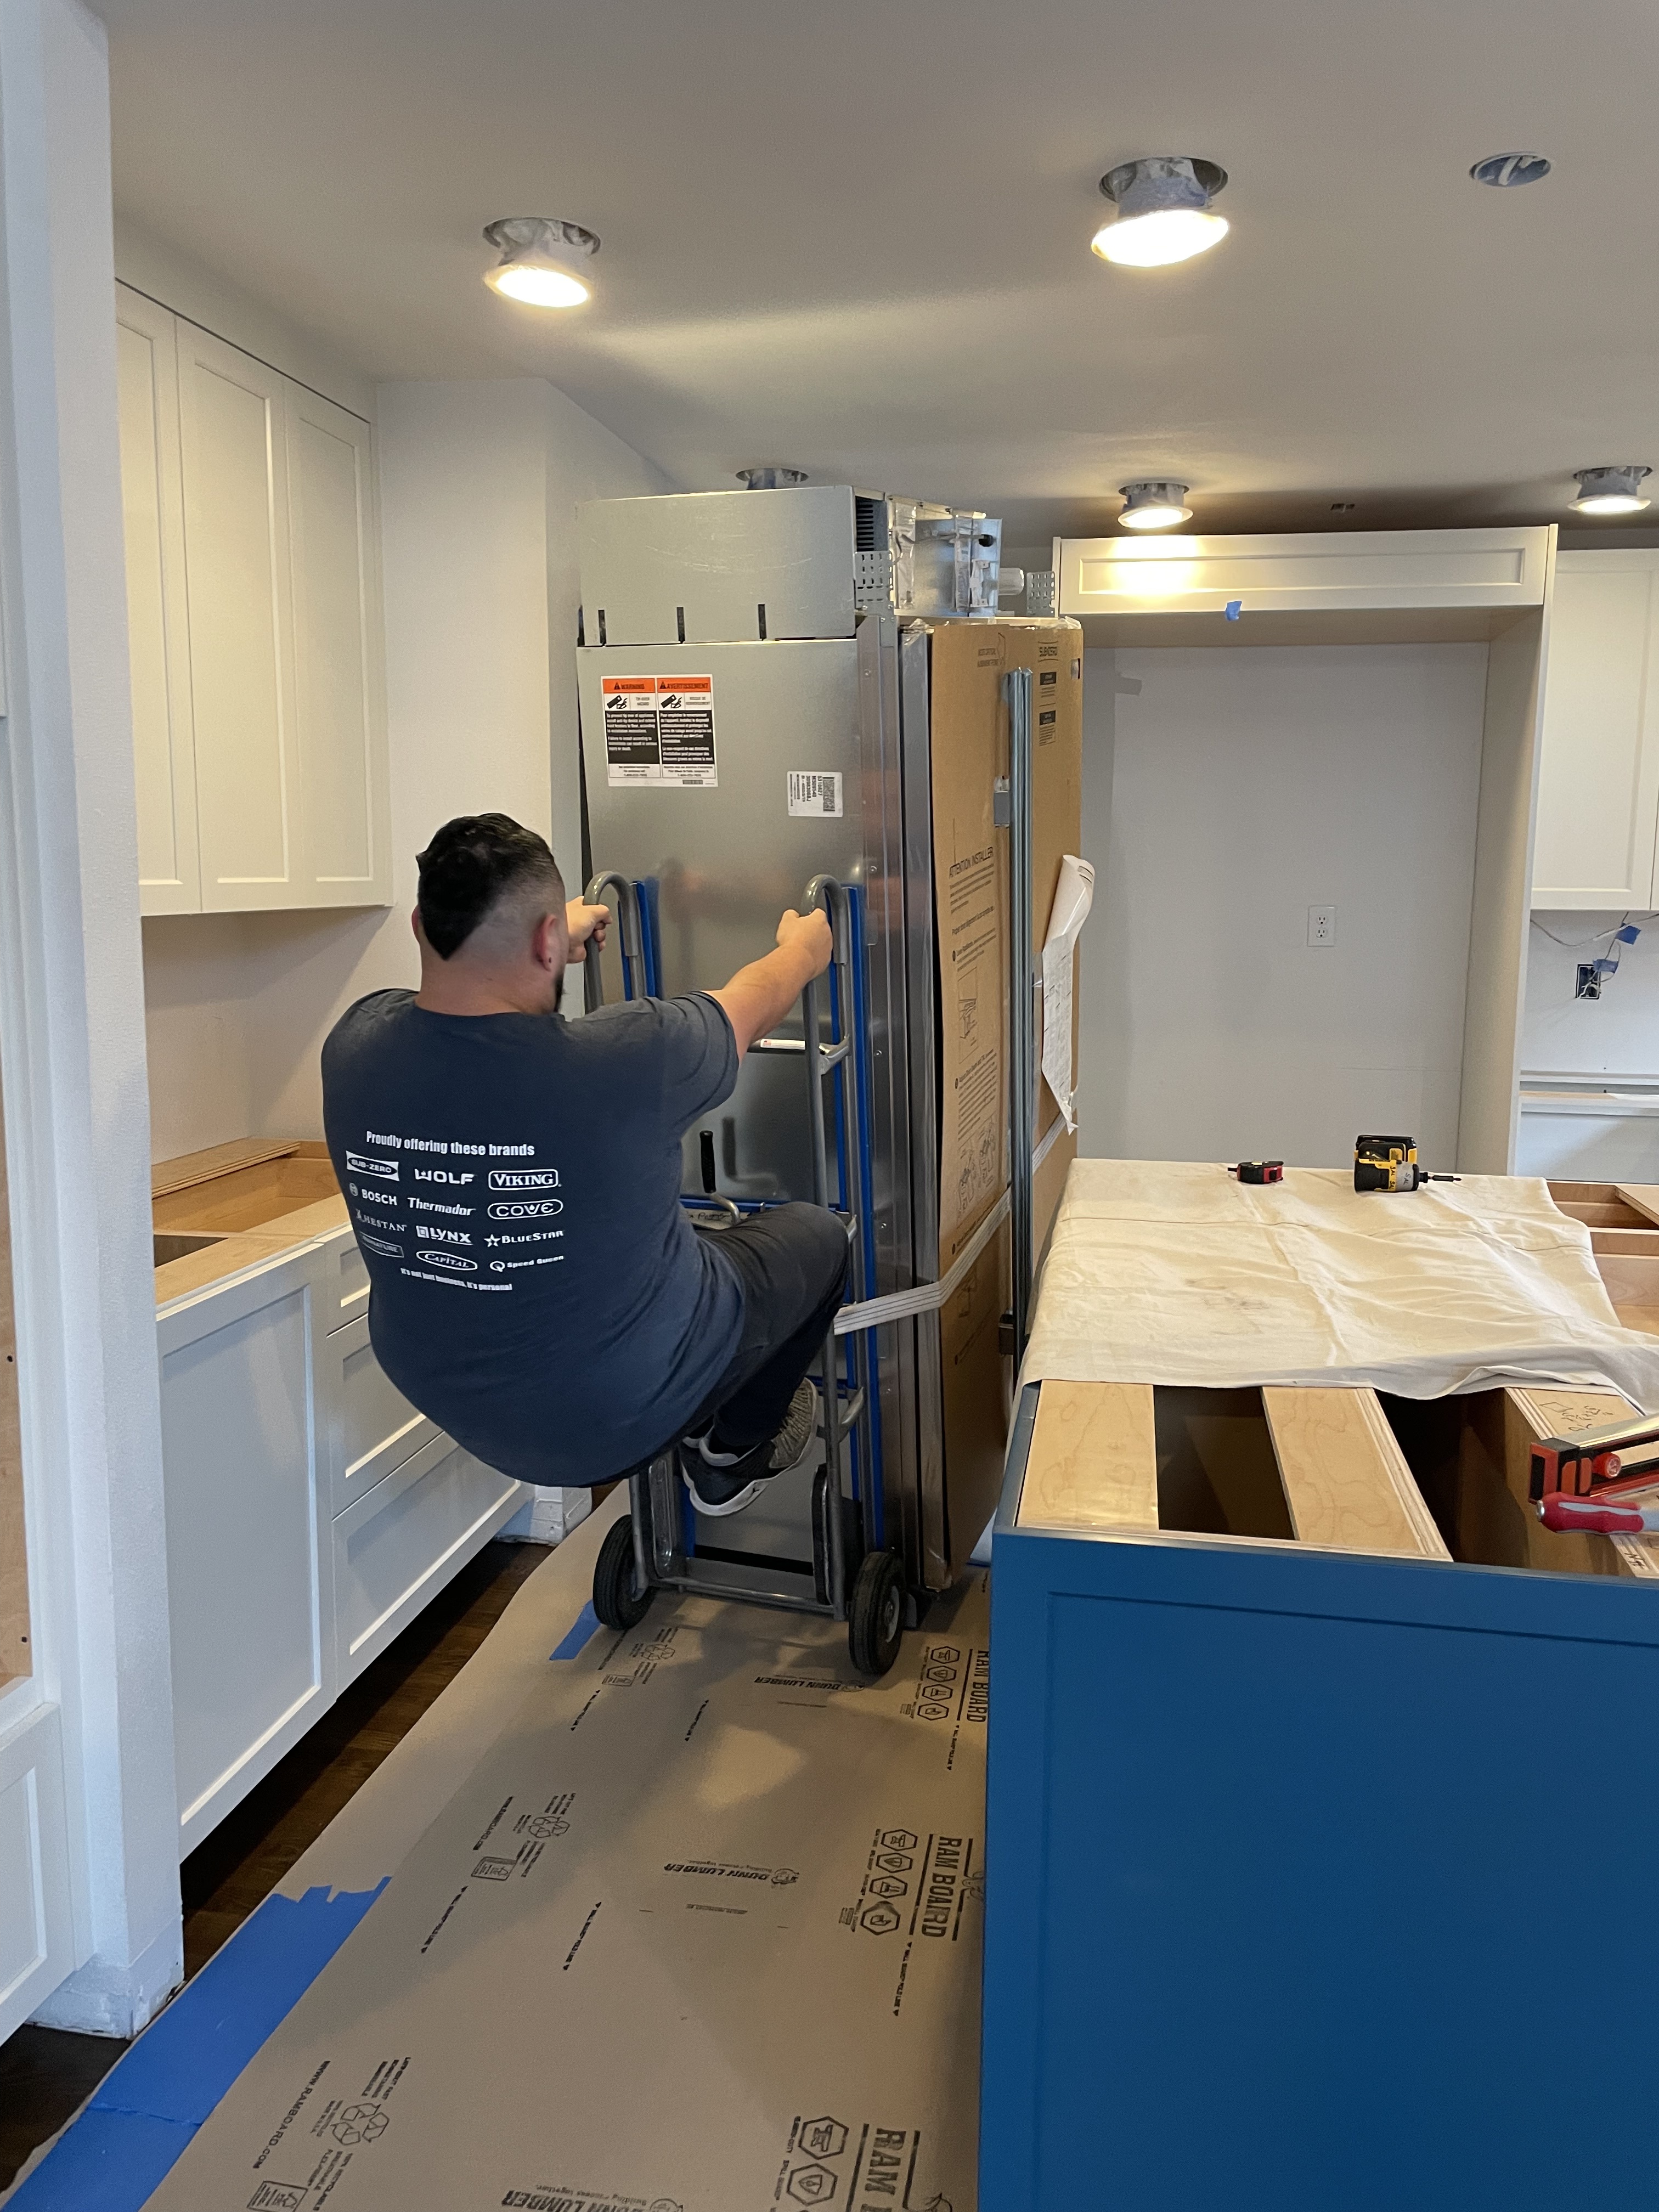
The installers were amazingly skilled at getting this thing into the house.
Getting it installed required excellent balance and strength.
Finally, the installed fridge fits snugly into its new home. And yes, we are keeping the plastic protection on for the duration of the remaining construction.
I have to say that the installers were AWESOME. They were very knowledgeable and skilled at their jobs, and very helpful.
This model also has a wireless module that gets installed (but is not included) which will be here tomorrow. This is supposed to help keep us abreast of any maintenance issues that might come up.
We had to wait 48 hours to cycle through 2 full bins of ice before we could toss out the old ice trays. Now, we have clean filtered water and ice again. We’ve started moving our cold food back in from the garage. Fortunately (but uncomfortably), we don’t have a lot of fresh food and produce requiring refrigeration right now since we don’t have a kitchen to make it.
Yet.
Soon, this will change.
Soon.
At least the old fridge is out of our bedroom now.
And yes – there will be pictures at the end of my rant.
Actually, our renovation project really begins here with the cabinets. Back in 2019 when we first started thinking about renovating the kitchen, we attended the Seattle Home Expo (before the lockdown and the year that wasn’t). We saw many interesting things, like giant “swim in place” lap pools, but the main thing we came away with was a reference for some high-quality cabinets, made locally in Woodinville.
We were astounded of the quality of the cabinets, and that they were inclusive of any inserts or accessories and were made locally to order. Of course, the pandemic struck next, and we soon forgot about them.
After going through the design/build ranks in Seattle, and even a store front kitchen design place, we had a general idea of what we wanted, but none of those places would satisfy us of the quality and customizability of their cabinets like the first place. After almost 2 years of trying to plan, design, and find a contractor/builder, we returned to the first cabinet company.
What a night and day experience. The first designers we worked with took some loose measurements and went away for a few weeks. They came back with drawings that were maybe 80% of what we wanted, but nothing looked quite right to us, and we made them tweak it several times – then, after COVID hit and things got crazy, we had to back off. We came back to them later, and they were so busy that they could not accommodate us for anywhere near the same budget. Everything got more expensive.
So, we went to that storefront place I mentioned earlier. Fortunately, they required no money up-front, and would design and estimate the layout in just a few days of working with us. They came up with the better plan after seeing what the first company did, and even found some outside-the-box ideas which helped us find our final layout. But they were WAY over budget also and would not let us choose better cabinets. They had a specific vendor that they used and would cost much more to get the cabinets we wanted in the colors we chose.
Fast forward through much frustration and emotional meltdowns, we eventually remembered the first cabinet vendor. After brining our sketchy plans and ideas, their designer/technician calmly began entering all the data and dimensions into AutoCAD (or some such architectural program) and began to lay out the entire plan. He came up with a cost estimate that very day, and even found a contractor to do the install of the cabinets and the remainder of the construction work to very close within our budget.
Now, that was a year ago that we signed our contract with them. There were some speedbumps on the way (I hate speedbumps, by the way – they are indeed evil). These speedbumps were us tweaking the final details, putting the finishing touches on all the accessories that we needed, and finally getting enough design time with the cabinet designer to make sure everything was covered. We finally finished it up and signed the contracts in November.
They said it would take 6 to 8 weeks for cabinet construction, but I think the order was expedited because we had cabinets delivered to us early in the second week of December – closer to 4 weeks production time. We thought they would fill one of our garage bays and that one of us would have to park in the driveway or on the street – that was a gross underestimation on everyone’s part. The cabinets alone filled one and half bays, so we were both out in the cold.
We arranged the main cooking wall in a line to make sure everything was there.
There were a few issues that we had, such as a miscalculation on where the rangetop and hood would be in the layout, but those issues were corrected expeditiously. In fact, see those two cabinets above without doors? Those were produced within 24 hours in order to correct the layout issues. There are a couple of chips in the finish, but we are supposed to be getting some touchup paint for those things.
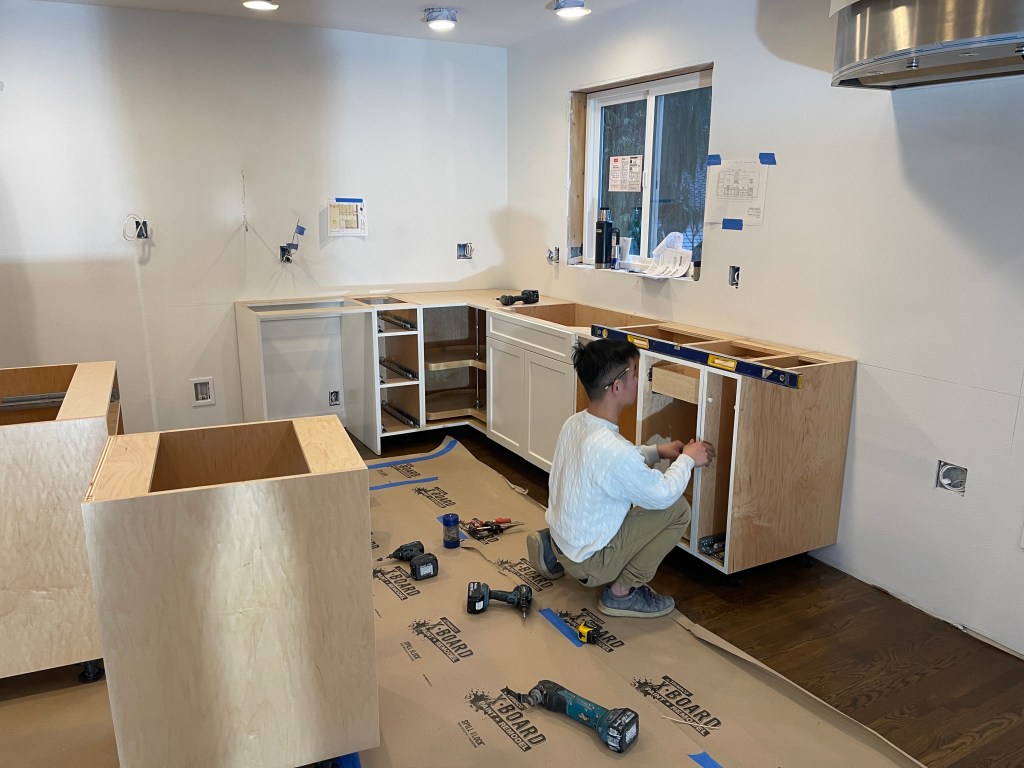
Fast forward (past two or three other blog posts and one ice storm) to this past week where the cabinet install began. First, was to get all the cabinets inside. That took longer than I think the installers were prepared for.
A snapshot from our “construction cam” showing the cabinets being staged for install.
One of the installers levelling and installing the main cooking wall cabinets.
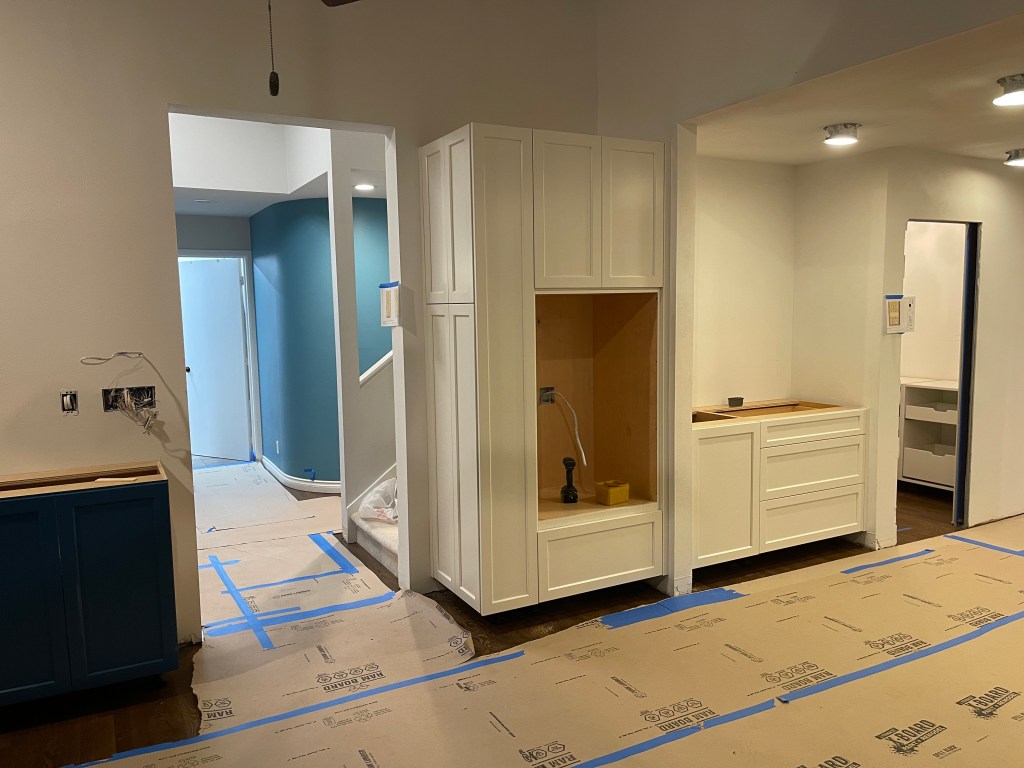
The lowers for the “buffet wall” in what is now our new dining room.
The new cabinet where the oven will be installed. The oven was previously in the section just to the right of where it is now, just next to the pantry door.
Complete lowers for cooking wall (minus drawers and a couple of doors).
The new cabinet for the fridge – we went with an upgraded size (48″ instead of the usual 36″). Not only will it help resale value, but we can get so much more stuff in it!
Uppers for the “buffet wall”.
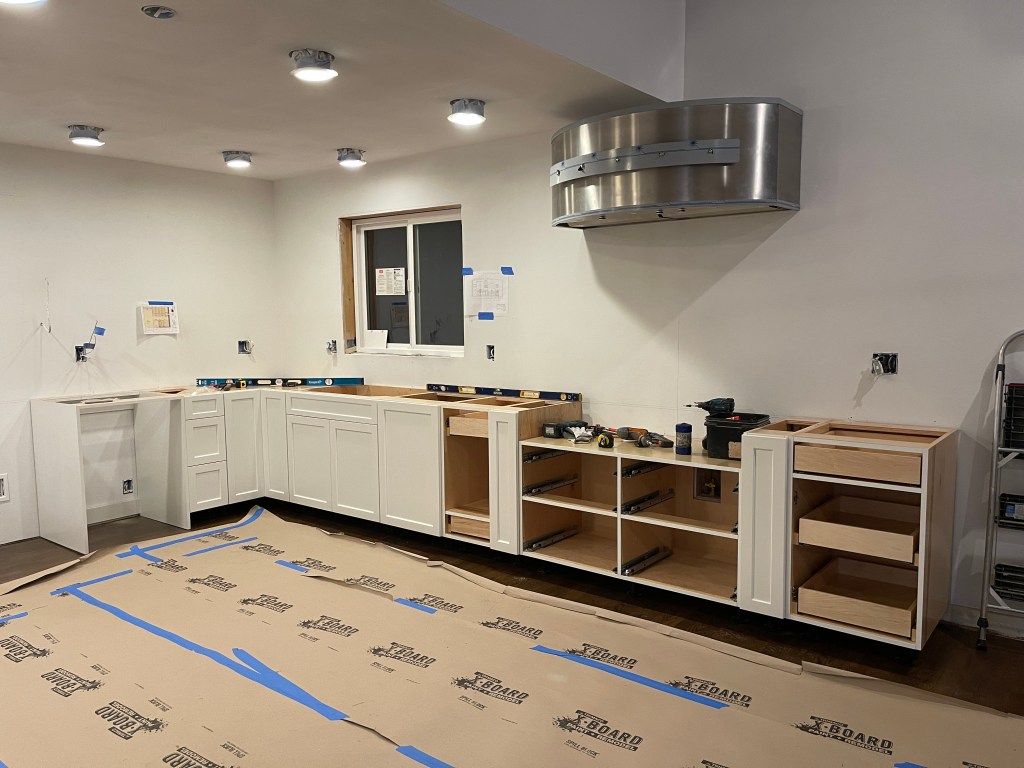
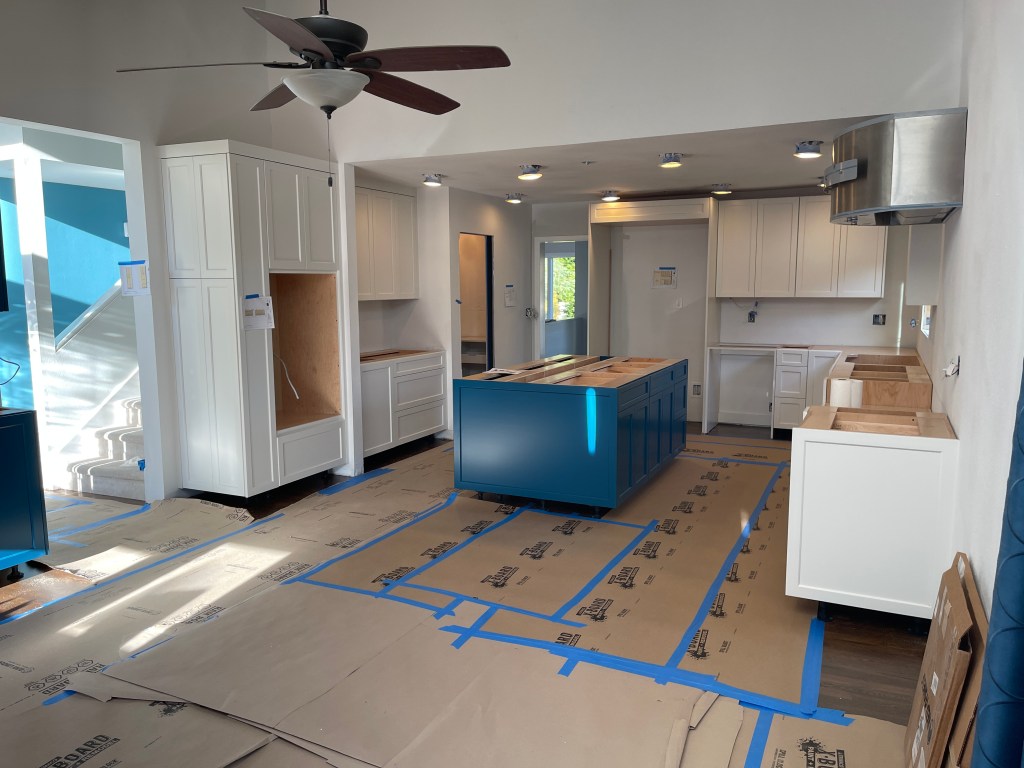
Final install state after getting as much done as could be at this time.
You’ve probably noticed that not everything is quite finished yet, but that’s okay – some of it we intentionally delayed in order to figure out what to do with the floor, and the crown moulding on the fridge wall is missing because the lights are actually in the wrong place and blocking the install. That will be fixed later.
While we had some issues with the install of the cabinets, I understand that it was par for the course of how these things go. Overall, they did a good job getting everything in place and correcting some install mistakes that our contractor caught and held them to task.
Remember how I said that we weren’t happy with the floor color? Well, the floor guy has risen to the occasion and offered to help us make it right. We mulled things over and decided the best/easiest way to make things match would be to refinish the living room to match the hallway/kitchen floor.
Now, in the picture from last post, you cannot see it, but the floor difference from the landing to the sunken living room is significant. The difference from the hallway to the master bedroom is less so. In fact, we are confident that we could ignore it and even eventually “forget” about it. So, the only logical way forward is to refinish the smaller living room and make sure that it matches the rest.
We are confident that the floor guy can make it right.
He’s not only a good and solid person, but also very skilled at what he does.
Since the change will be small, we will not leave the house and go to a hotel (I’m out of Hilton points anyway). This should be done by the weekend, and the rest of the renovations can continue apace.
What can I say? Everything in the house rests on the floor – it’s the foundational element in any remodel. In fact, when we renovated our master bedroom, it started with the changing of our closet. It was too small and there was a section that was cut out and set aside for a vanity and chest of drawers. However, we didn’t need that and had the wall removed. That meant that there were gaps in the flooring: and lo-and-behold a whole room renovation was now required just from changing a small part of a closet.
That project took almost six months to complete in small stages in Spring of 2021.
Why are we talking about the master bedroom when the kitchen is all the rage right now? Well, they are closely connected. Quite literally, connected by the flooring.
Speaking of the closet, let’s throw a few pictures of the end results of the master bedroom & closet remodeling project:
New closet layout
Back wall of master bedroom – shiplap on rear wall, new baseboards and window casements, and new floor. Not just a new stain, but an entirely new floor. The old floor was a hideously blonde bamboo from one of the previous owners.
Old blonde bamboo flooring – now since burned with the fires of heaven. Well maybe not burned, but we wanted it as far away from us as we could get it.
Back to our current renovation, we are now connected by the floor in the master bedroom to the floor in the hallway, entry way, dining room and kitchen – they are all the same:
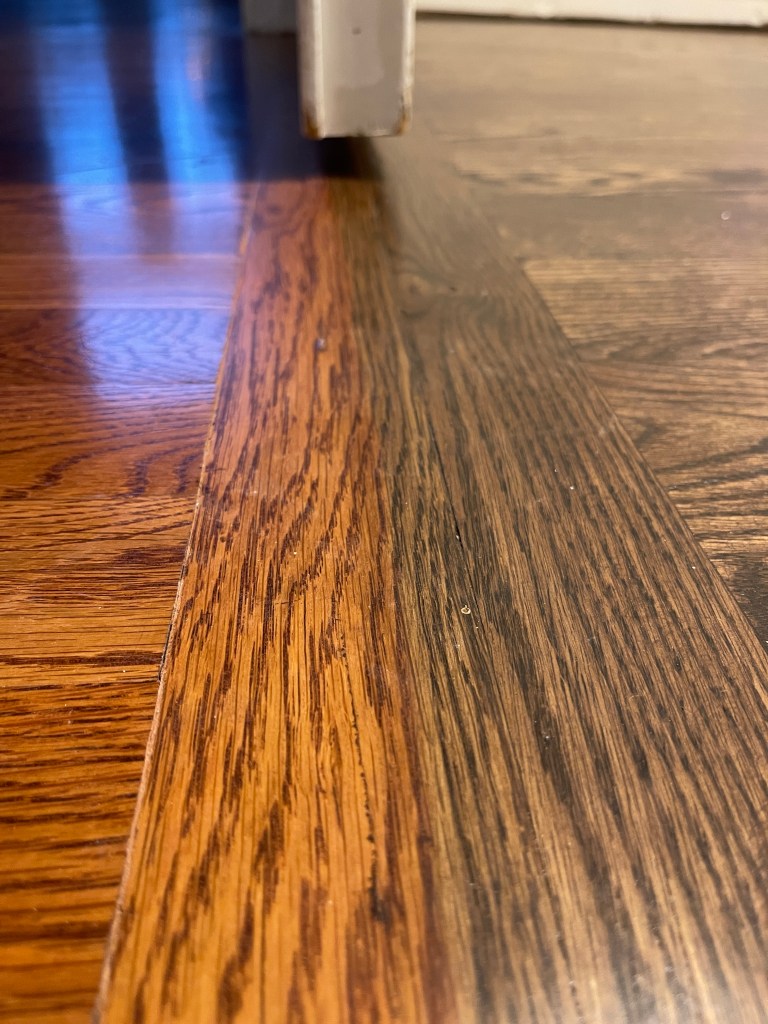
Here is the join – notice the different color. On the right, new flooring in the master is red oak (which we though the flooring on the main level was).
On the left, is actually white oak – not what we were originally told and had we known, we would have gone with white oak all the way through for a consistent stain color.
We knew this was a sticking point and wanted to be careful about getting the color right.
Fast forward a bit to the last couple of weeks.
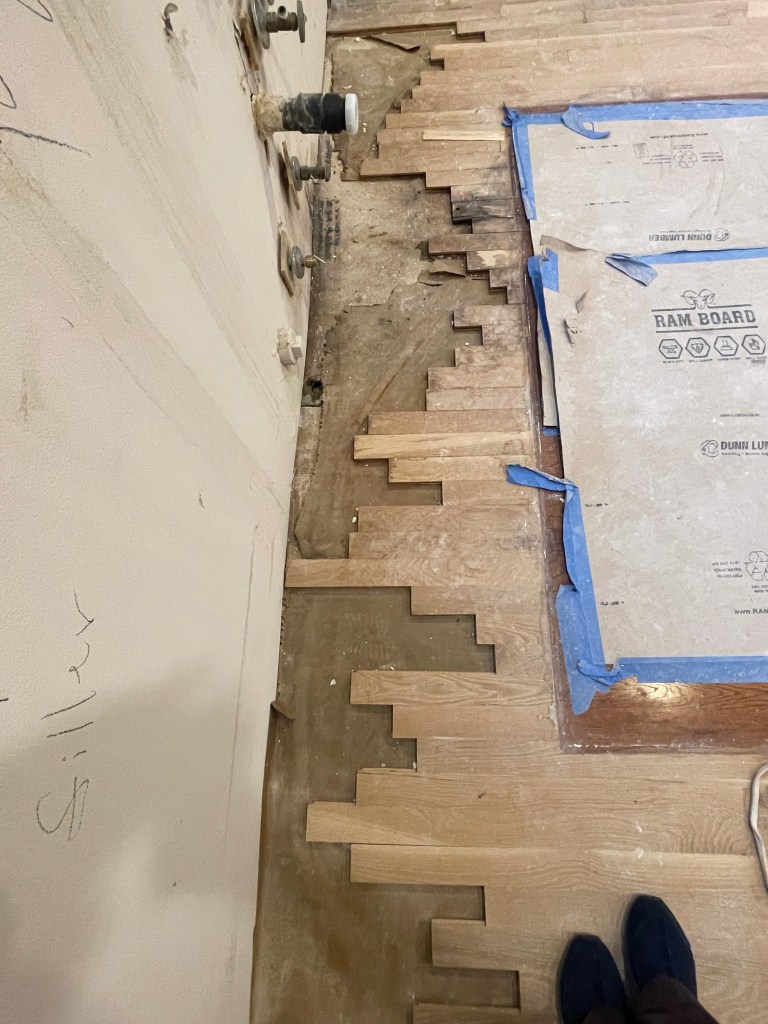
Since we are changing the kitchen layout, there are parts of the floor which have never seen the light of day in 35 years, and some which have degraded or been cut for some nefarious purpose (and by that I mean some shoddy duct work and water line rerouting). There was a great deal of patching and repairs to be done.
The floor team was actually quite skilled at the repairs and finishing techniques and many holes and gaps were repaired and filled in.
Before repairs
Repairs being done.
Repairs and flooring sanded.
At this point, we are in a hotel – the sanding and staining are not pleasant to be around. The dust just makes me cough, and the stains and topcoats are somewhat toxic. We used a few free hotel points to stay at a nearby hotel for a few days.
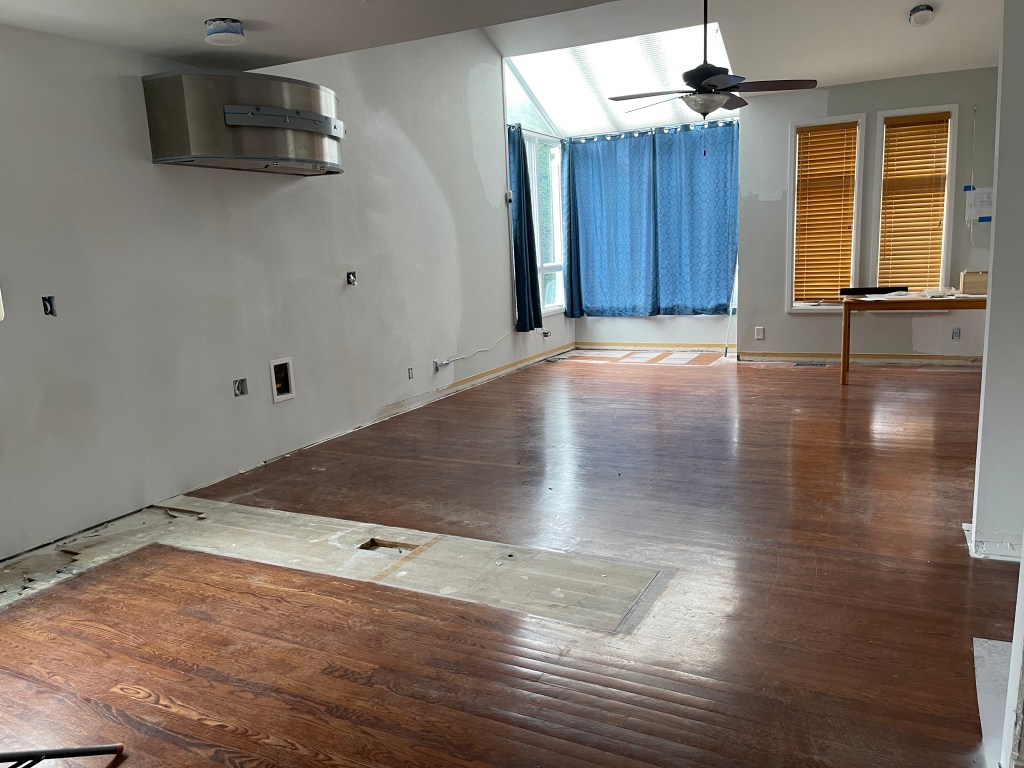
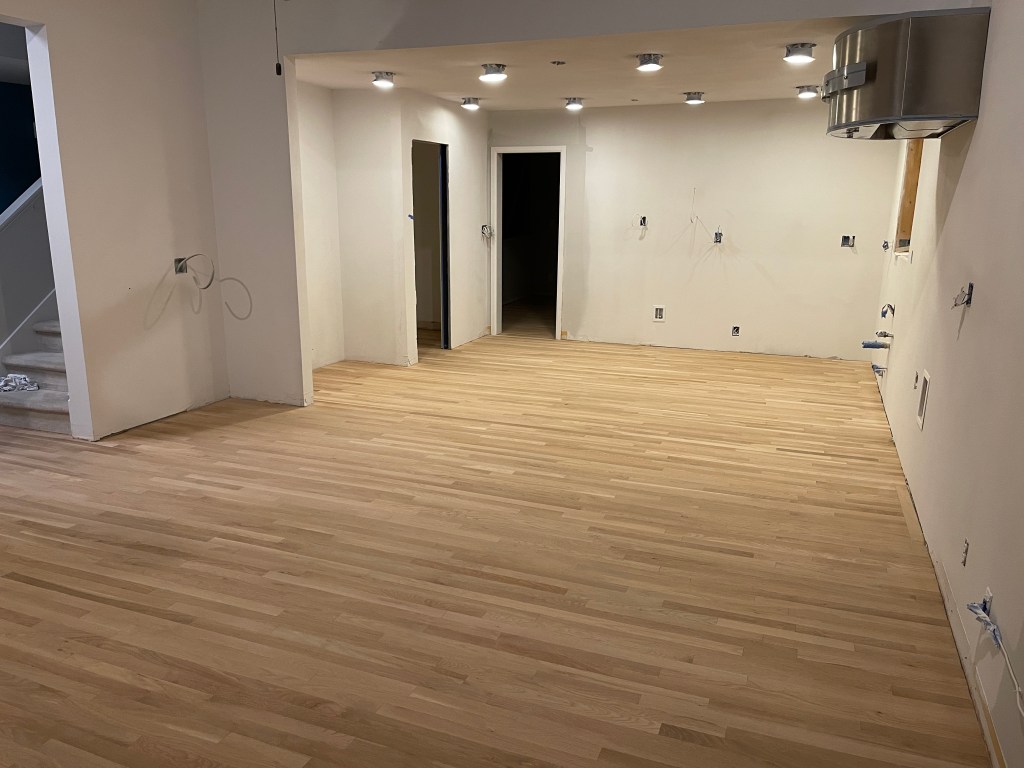
Here is the result.
View from the back of the kitchen.
And ooops. The flooring does not match – it’s even worse at the steps into the living room.
While the rest of the floor looks wonderful, and the quality of the finish is great, the color is not what we wanted and looks strangely green in the area of the steps at the top of the last picture. We are not happy with it, but we are hopeful that our floor guy will be able to come up with a fix.
We’re not letting it delay us, though – cabinets are next for this week. Once those are in, we will start putting the appliances back and template for the counter tops.
We have the faucets on order to arrive soon, as well as the cabinet pulls and knobs. So many details to get done!
Part of any renovation will include electrical work – and that also means removing some sheetrock as well. In our case, the electrical work was more extensive than planned – over three times as much effort and cost.
See, the house was built back in the 80s: 1987 it was completed. What that means, in the most significant sense, is that codes have changed quite a bit since then, as well as kitchen life. There are many more new, high-power appliances that are in use today; many more countertop devices, like toaster ovens, air fryers, rice cookers, etc. than there were in the 80s. This means a considerably larger current draw on existing circuits.
Of course, when your 80s house isn’t even up to 80s code, that makes it all the more work to bring it up to modern specs.
It seems that our kitchen circuit for small appliances (which should have been at least 2 circuits in a house this size) was not only the kitchen outlets, but the dining room, front room, crawl space, and some hallway outlets also. That is almost half the main floor on one circuit. We tried putting two heaters in the room early on to keep it warm for construction. That tripped the breaker even though they were plugged into different rooms.
So, several days of electrical later, we have several new circuits in the kitchen, dining, and other parts of the house which needed it. I don’t have pictures of the new wires and circuits, but I do have pictures of what came next:
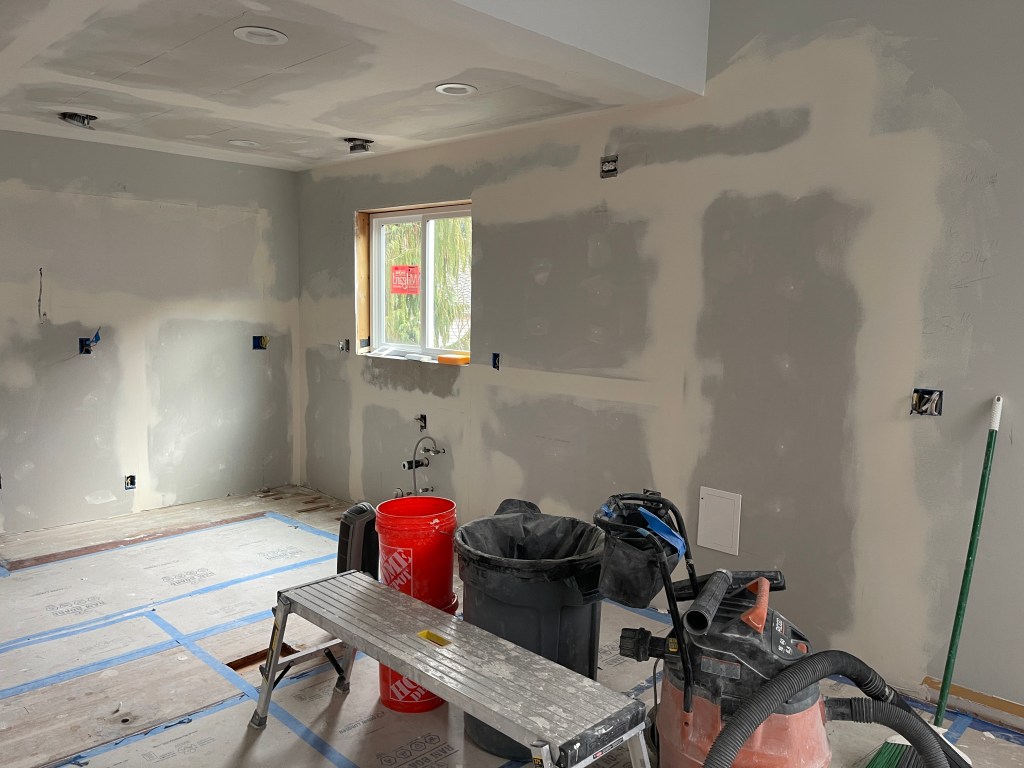
Drywall. Lots of it.
We had to have a lot of new dry wall added in the places where we removed the window and door and the extra closet and decorative wall. Those are all gone now, and sheetrock has been replaced and repaired.
Following the sheetrock and mudding, new texture and primer were applied.
The door here is the new pantry pocket door primed and ready for install.
Some good benefits from the renovation here in addition to the new circuits, I now have sound dampening insulation in the kitchen ceiling – which helps not only with noise coming from my office when I roll around in my chair, but from the kitchen to my office. Sounds are now very muffled, and my office is much quieter than it was before.
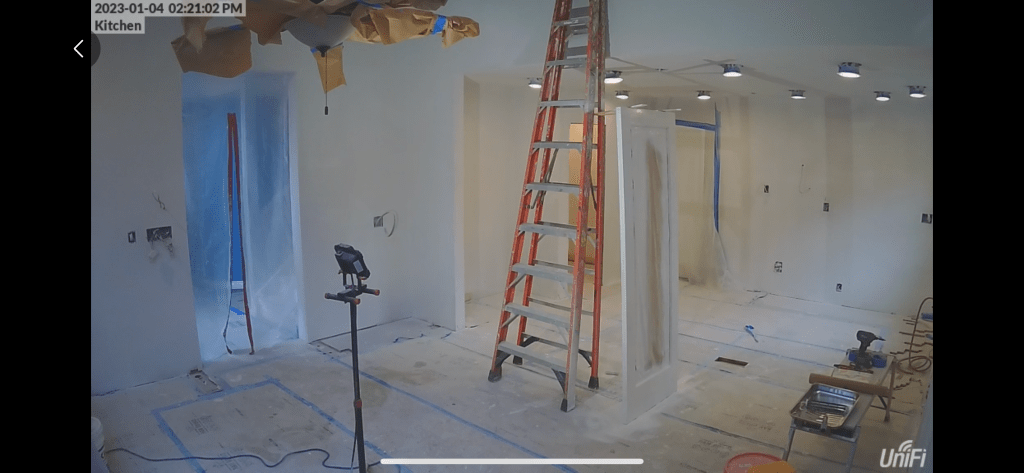
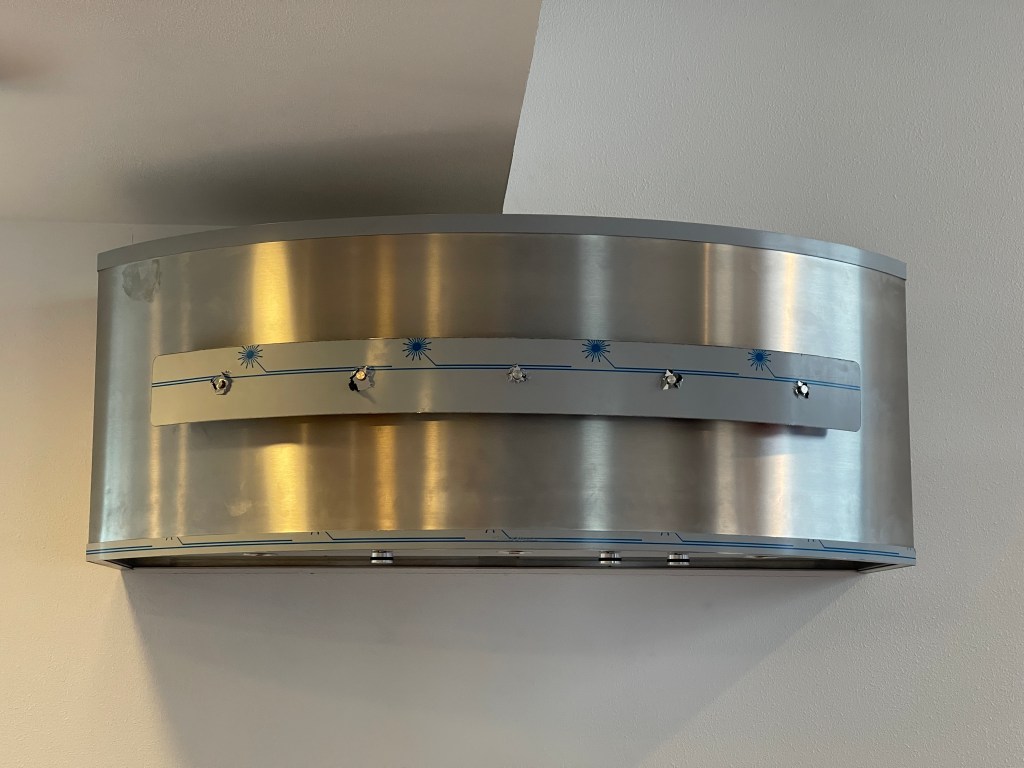
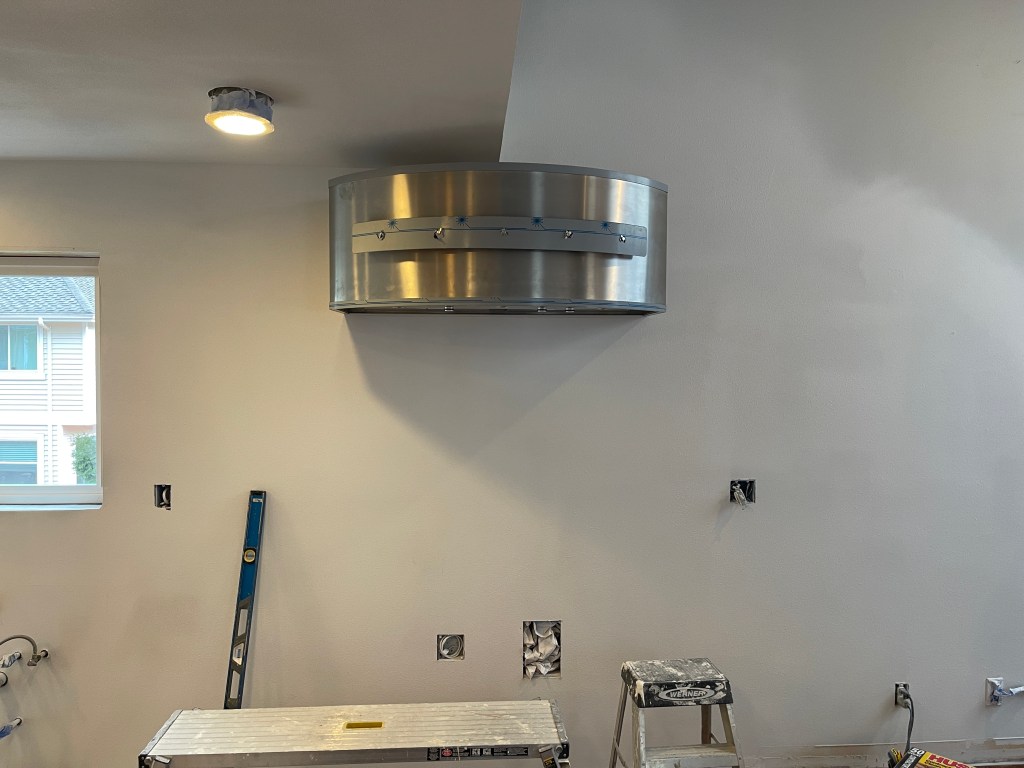
In addition to primer and texture, we have the new vent hood installed above the space where the new range top will be installed.
Close up
Wide shot
I got to help install this – we needed three people to mount it properly and I helped hold up my end.
Now, all I need is a new range top and I can fry me up some bacon!
Now that the project is underway, our house is in a bit of a state. Shambles, really. Or at least the ground floor is.
When we first envisioned this project, we had grand dreams of doing things like a “Demo Day” party – inviting the neighbors over for some good old-fashioned destruction while sipping mojitos or some such frilly drink in hand. Of course, originally, we were planning to start this project a couple of years ago.
Now, we were SO ready for it to start, that all those plans and images (mostly fed by HGTV renovation shows of course) have been thrown by the wayside in the name of speed. No champagne toasts for us and the sledge-hammer-swinging neighbors – just a flurry of contractors ripping stuff out and throwing into a dumpster.
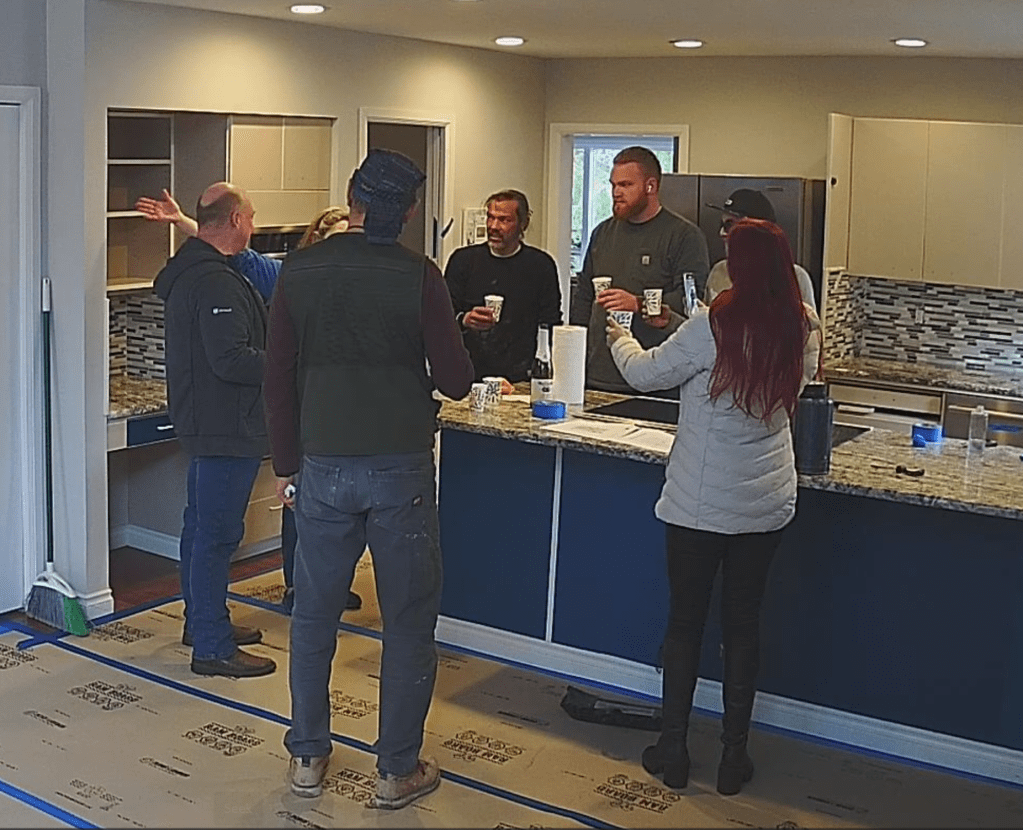
We did have a tiny toast with sparkling apple juice for the demo team, however:
A toast to the demolition team
The removal of all cabinets was very quick, followed by the removal of the extra closet and wall – which was purely decorative.
Closet and wall removed
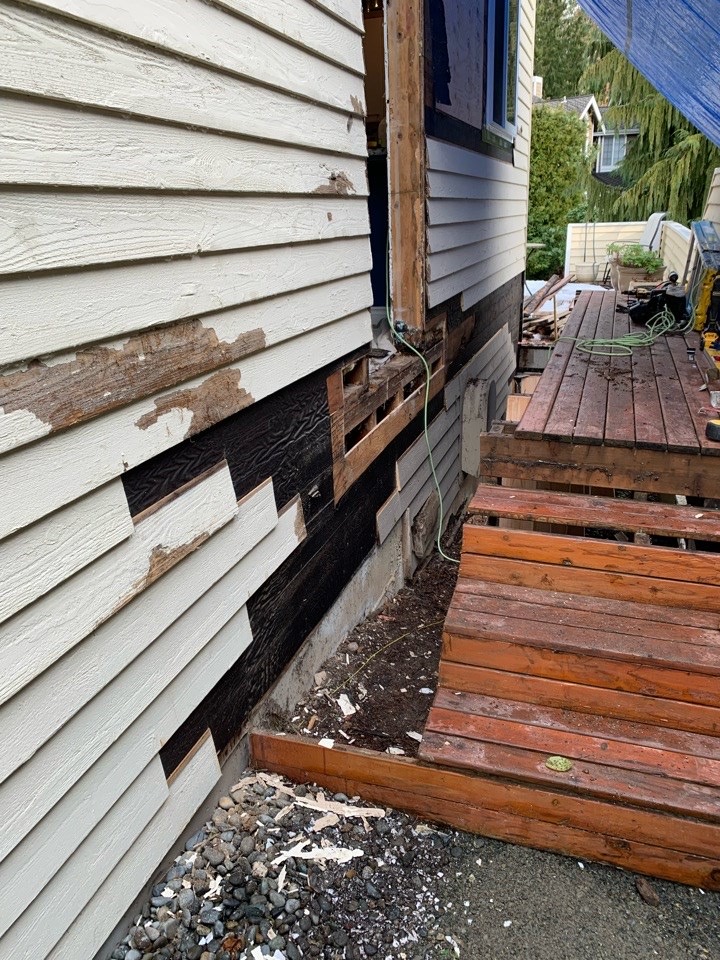
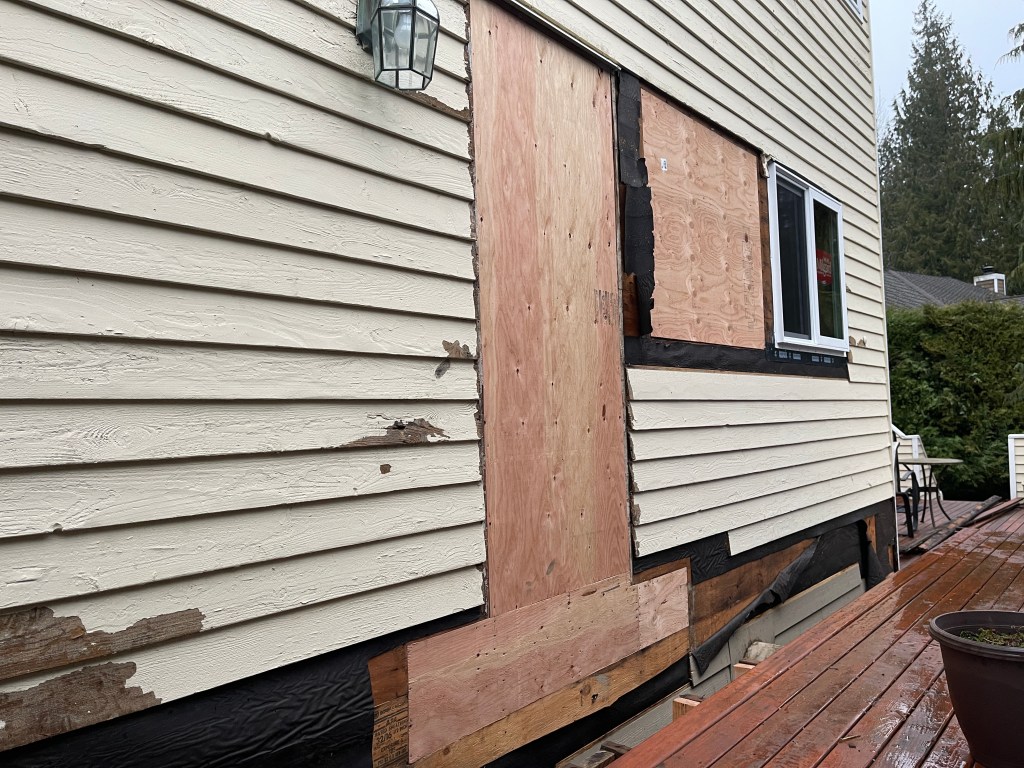
One bad thing was uncovered during demo. As part of our plan, we removed a door and window from the side wall of the house. This was to both increase the counter space by moving it further into the main room and to remove the extraneous door – we had 5 doors on the house. On door removal, we discovered rot around the base of the door which had to be repaired:
Rotten wood
This meant removing all the rotten wood and replacing it and doing quite a bit more siding than was planned. We also used this as an excuse to remove the narrow part of the deck, which was wobbly and unstable.
Repairs
This was then walled-in and repaired. This was an additional cost, of course, but our contractor gave us some discounted labor costs since it was unexpected.
With this, our kitchen renovation was fully underway.
Since moving into our new house in 2019, it has always been our plan to renovate the kitchen in this house. It was the worst room in the house. The last owners before us did some renovations, but it was clear that they skipped the kitchen to do other things in the house – quite possibly because they knew how big the job would be. I can’t say I blame them completely for that: after what we have been through just trying to find the right company to work with, it has been a very difficult process.
First, I will say right off that we got an excellent price for the house – the only house at the time in the neighborhood that went below market. It was certainly miraculous that we even got the house at all at just the right time. That being said, we knew it needed work when we bought it.
So, we went looking for contractors who would not only help us with designing a layout for the kitchen, but also do the general contracting work – a “design build” company. The first place we contacted was the best-known company and gave us an informal high-ball range that shocked us to no end. We found another company that we liked who also would create a whole house plan that could be implemented in phases, and we would own the design. We liked that.
We started planning with them. Then: COVID. Boom. Lockdowns, market crash, supply problems, and demand. And by demand, I mean that with everyone stuck at home looking at their boring walls, the entire country decided to do home remodels all at the same time.
We put our plans on hold.
Not only did we do that, but we did other projects in the meantime as well: master bedroom full remodel, including new floor and closet, new door and small deck removal; back yard cleanup; my office floor and repainting; new garage cabinets. All these took time and money away from our main goal of the kitchen.
A year later, we tried to pick up the pieces again only to find out how bad the situation was. We weren’t satisfied with the plan and tried to work with the designer to change it – and were less satisfied with the results. Then, their price went up higher than we had originally discussed all while the stock market had taken a dive – along with our main savings. So again, we waited. A few months later, we went to a storefront design company that helped us work through a wonderful plan. We like what we saw, and the designer was very helpful at getting everything in we wanted – except for the price which was WAY higher than the last company. We moved on again.
Finally, we remembered a local cabinet maker from the Seattle Home Expo back in 2019. We thought we’d check with them on the cabinets and see if they had suggestions on how to make it work. Of course, they did! They worked out a design along the lines of what we were happy with out of the last few attempts and then found a contractor who would help us with the build out and install – and all roughly within our original budget.
So, at the first part of the year, we signed on with them. Yes, it’s a year later now, but we had to work through several details: exact cabinet placement, accessories inside the cabinets, exact dimensions of the room (harder to nail down in an open space like our kitchen), and appliances (both new and old). Once the details were finalized, the cabinets were ordered, and demolition began.
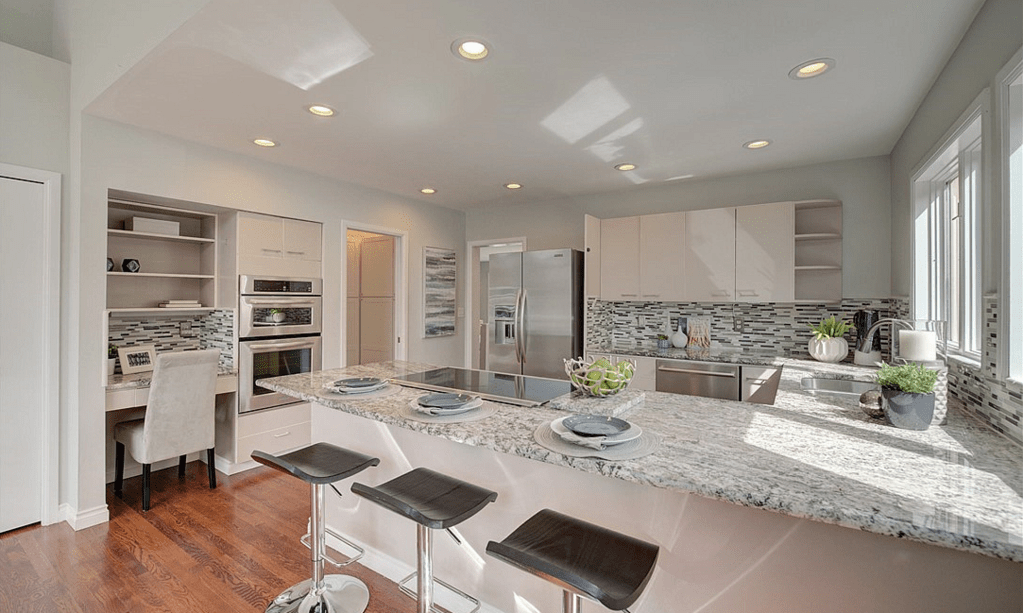
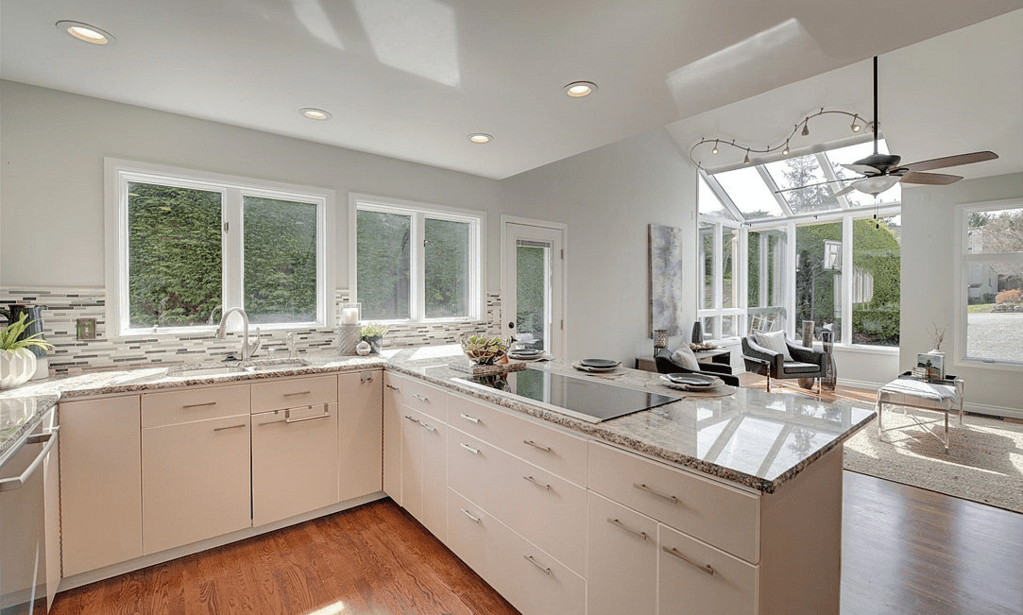
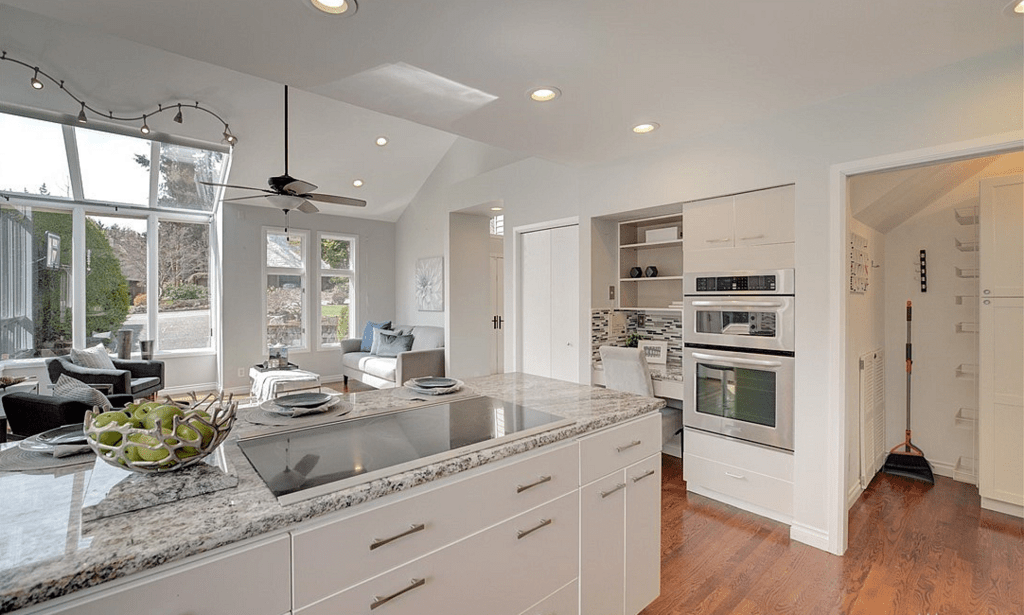
First, I’d like to share the very nice photos from our house when it was originally listed for comparison:
A view into the kitchen
The original size of the kitchen – not using all available space. The new kitchen will remove the door and right-hand window and extend the counter a couple of feet past where the door is in this picture.
There will also be an island instead of this peninsula. The ovens will move to where the closet is on the left. The space in front of the peninsula will become the dining room and be smaller than it is in this picture since the kitchen will extend several more feet into that open area.
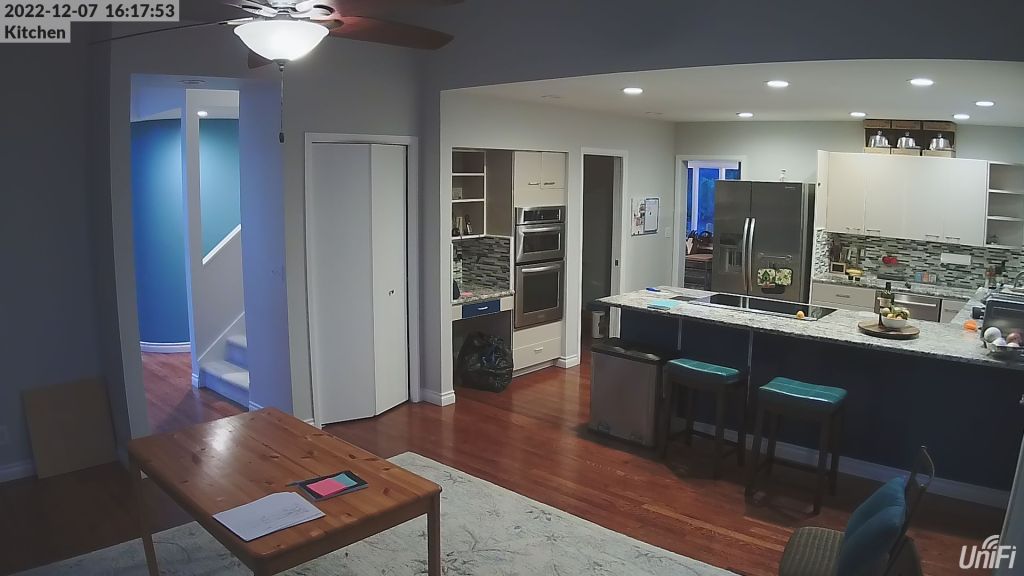
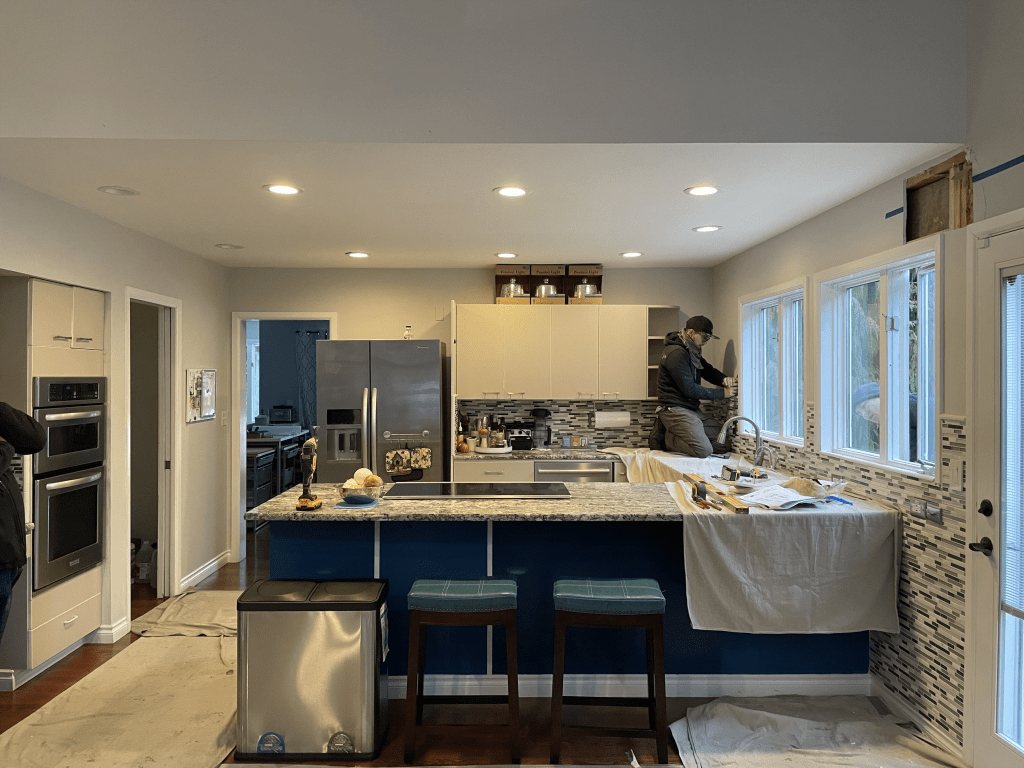
We have a camera in the room to take still shots for a stop-motion video of the whole remodel process. I’ve included some more photos below of the last picture before demolition of the main kitchen peninsula and one at the start of demo.
View from the video camera.
Just starting demolition.
A view to the side where we will have a new buffet area and what will be the new dining room.
I will have some more updates later. There is much going on and much to tell.